プライベートネットワークの接続
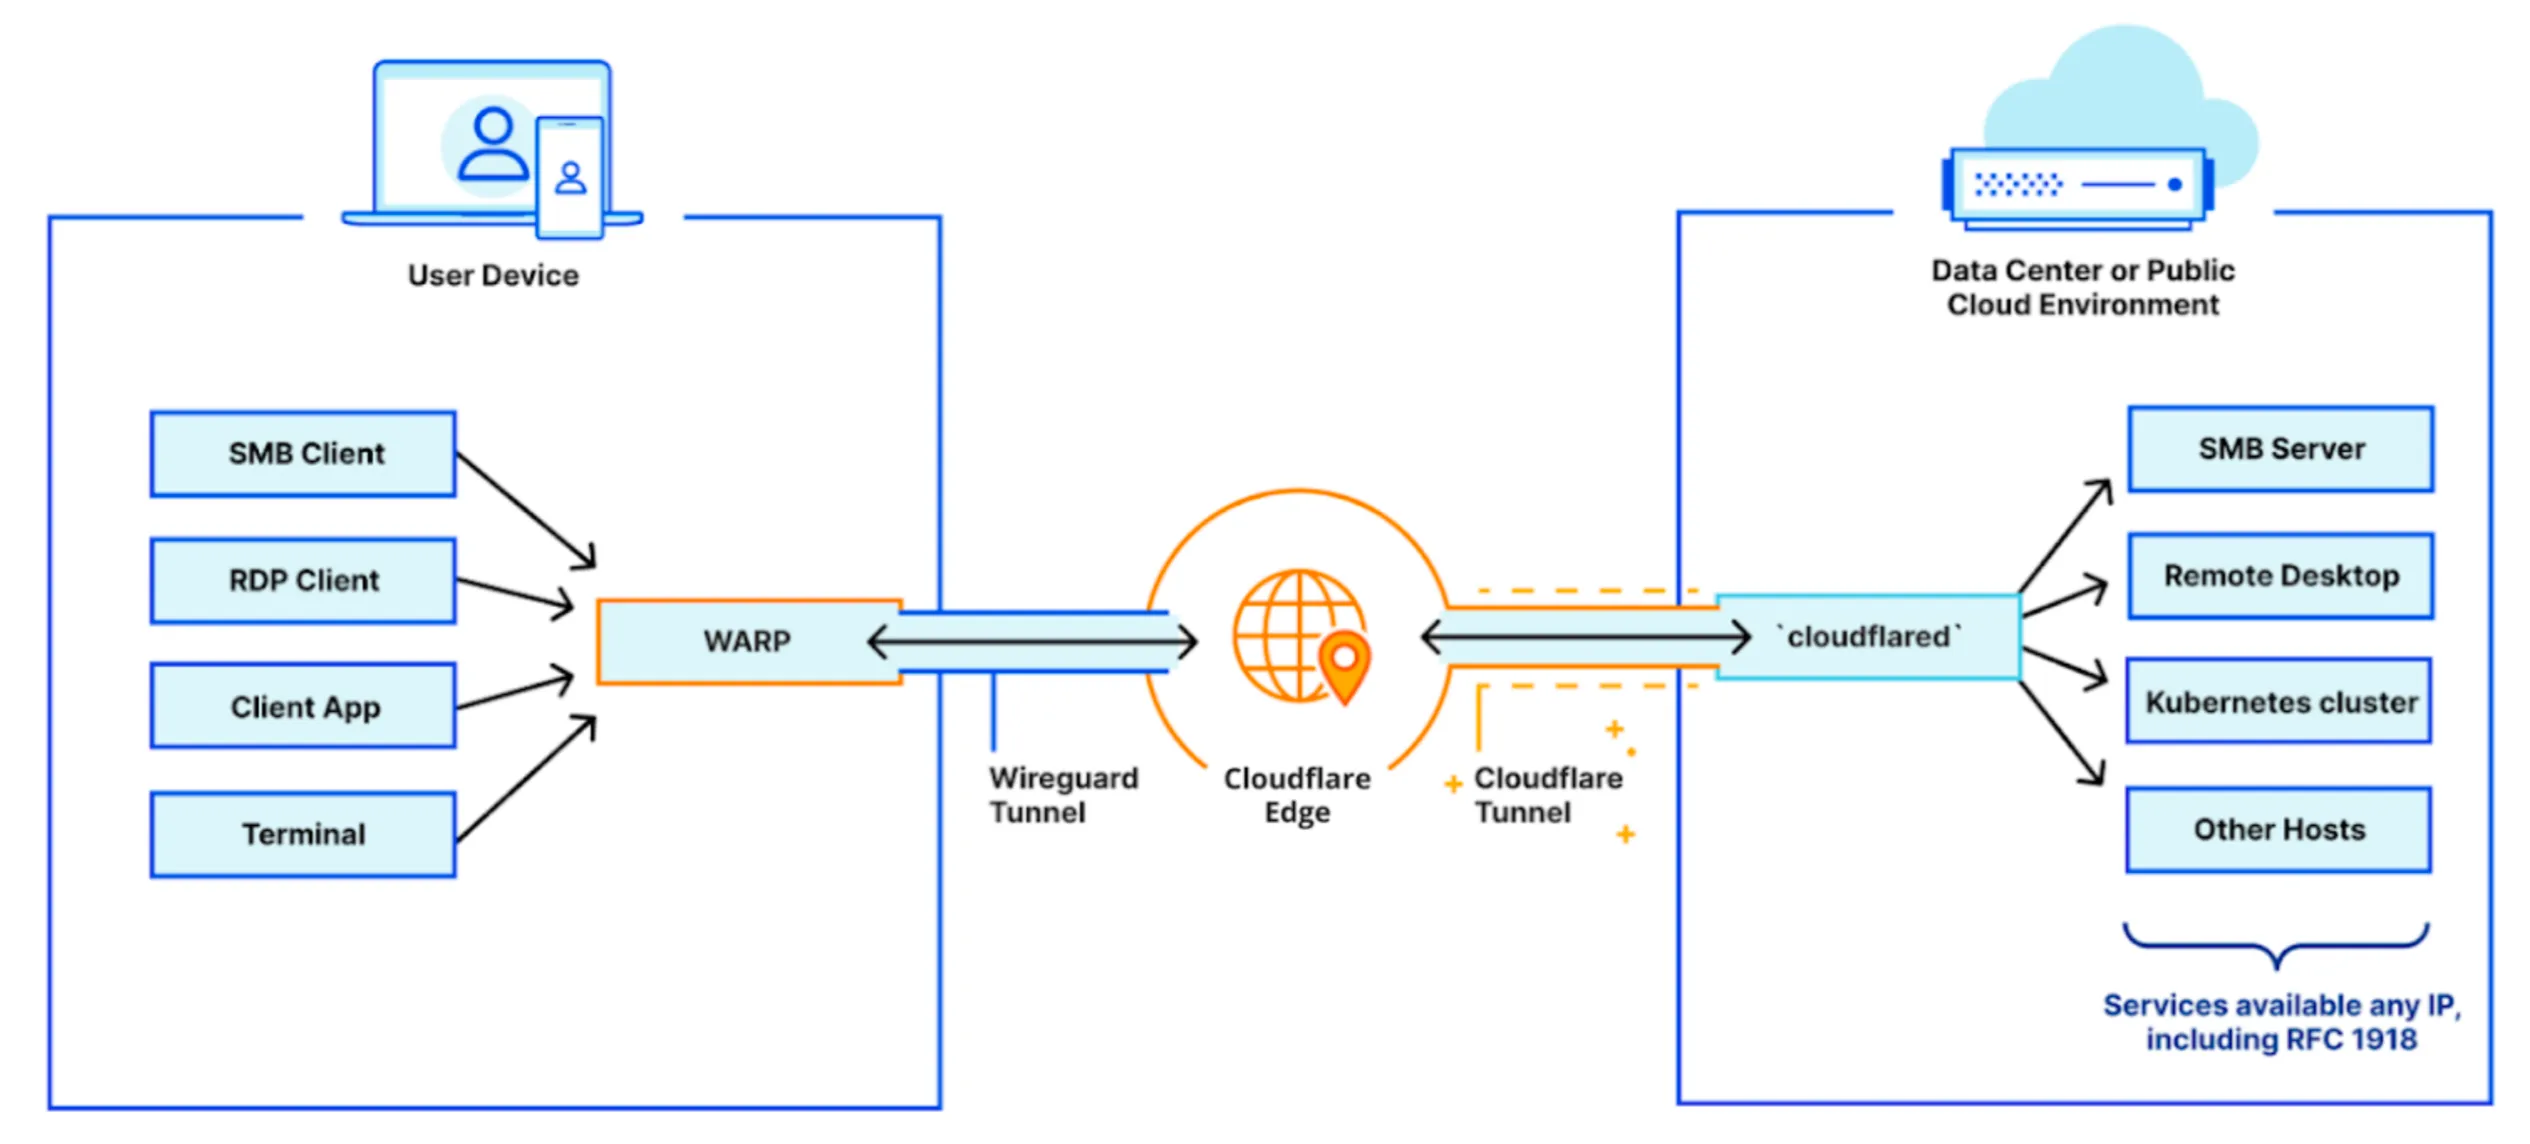
プライベートネットワークには、サーバーとクライアントの2つの主要なコンポーネントがあります。サーバーのインフラストラクチャ(単一のアプリケーション、複数のアプリケーション、またはネットワークセグメントのいずれか)は、Cloudflare Tunnelを介してCloudflareのグローバルネットワークに接続されています。これは、サーバー上でcloudflaredデーモンを実行することによって行われます。
クライアント側では、エンドユーザーがCloudflare WARPクライアントを使用してCloudflareのグローバルネットワークに接続します。WARPクライアントは、社内のMDMツールを使用して、数分で組織全体に展開できます。ユーザーがCloudflare Tunnelを介して利用可能なIPに接続すると、WARPはその接続をCloudflareのネットワークを通じて対応するトンネルに送信します。
プライベートネットワークへのリモートアクセスを有効にするには、以下のガイドに従ってください。
インフラストラクチャをCloudflare Tunnelに接続するには:
-
ダッシュボード設定ガイドに従って、サーバー用のCloudflare Tunnelを作成します。アプリケーションの接続ステップをスキップし、ネットワークの接続に直接進むことができます。
-
トンネルのプライベートネットワークタブで、プライベートネットワークのIP/CIDR範囲(例:
10.0.0.0/8)を入力します。これにより、WARPクライアントはこのIP範囲へのリクエストが新しいトンネルにルーティングされる必要があることを認識します。
To connect your devices to Cloudflare:
- Deploy the WARP client on your devices in Gateway with WARP mode. The Cloudflare certificate is only required if you want to display a custom block page or filter HTTPS traffic.
- Create device enrollment rules to determine which devices can enroll to your Zero Trust organization.
By default, WARP excludes traffic bound for RFC 1918 space ↗, which are IP addresses typically used in private networks and not reachable from the Internet. In order for WARP to send traffic to your private network, you must configure Split Tunnels so that the IP/CIDR of your private network routes through WARP.
-
First, check whether your Split Tunnels mode is set to Exclude or Include mode.
-
If you are using Include mode, add your network’s IP/CIDR range to the list. Your list should also include the domains necessary for Cloudflare Zero Trust functionality.
-
If you are using Exclude mode:
- Delete your network’s IP/CIDR range from the list. For example, if your network uses the default AWS range of
172.31.0.0/16, delete172.16.0.0/12. - Re-add IP/CDIR ranges that are not explicitly used by your private network. For the AWS example above, you would add new entries for
172.16.0.0/13,172.24.0.0/14,172.28.0.0/15, and172.30.0.0/16. This ensures that only traffic to172.31.0.0/16routes through WARP.
- Delete your network’s IP/CIDR range from the list. For example, if your network uses the default AWS range of
By tightening the private IP range included in WARP, you reduce the risk of breaking a user’s access to local resources.
デフォルトでは、Zero Trust組織に登録されたすべてのWARPデバイスは、Cloudflare Tunnelを介してプライベートネットワークに接続できます。Gatewayを構成してネットワークトラフィックを検査し、ユーザーのアイデンティティやデバイスの姿勢に基づいてアクセスをブロックまたは許可することができます。
- Go to Settings > Network.
- Enable Proxy for TCP.
- (Recommended) To proxy traffic to internal DNS resolvers, select UDP.
- (Recommended) To proxy traffic for diagnostic tools such as
pingandtraceroute, select ICMP. You may also need to update your system to allow ICMP traffic throughcloudflared:
Linux
-
Ensure that
ping_group_rangeincludes the Group ID (GID) of the user runningcloudflared.- To get the Group ID of the user, run
id -g. - To verify the Group IDs that are allowed to use ICMP:
Terminal window sudo sysctl net.ipv4.ping_group_rangenet.ipv4.ping_group_range= 0 10000- Either add the user to a group within that range, or update the range to encompass a group the user is already in. To update
ping_group_range:
Terminal window echo 0 10001 | sudo tee /proc/sys/net/ipv4/ping_group_range - To get the Group ID of the user, run
-
If you are running multiple network interfaces (for example,
eth0andeth1), configurecloudflaredto use the external Internet-facing interface:Terminal window cloudflared tunnel run --icmpv4-src <IP of primary interface>
Docker
In your environment, modify the ping_group_range parameter to include the Group ID (GID) of the user running cloudflared.
By default the cloudflared Docker container ↗ executes as a user called nonroot inside of the container. nonroot is a specific user that exists in the base image ↗ we use, and its Group ID is hardcoded to 65532.
Cloudflare will now proxy traffic from enrolled devices, except for the traffic excluded in your split tunnel settings. For more information on how Gateway forwards traffic, refer to Gateway proxy.
特定のアプリケーションへのアクセスを管理するためにZero Trustポリシーを作成できます。
-
アクセス > アプリケーション > アプリケーションを追加に移動します。
-
プライベートネットワークを選択します。
-
アプリケーションに名前を付けます。
-
アプリケーションタイプとして、_宛先IP_を選択します。
-
値にアプリケーションのIPアドレス(例:
10.128.0.7)を入力します。 -
アプリランチャーの可視性とロゴを設定します。
-
次へを選択します。宛先IPへのアクセスを許可する1つの自動生成されたGatewayネットワークポリシーと、アクセスをブロックする別のポリシーが表示されます。
-
ポリシーを修正して、追加のアイデンティティベースの条件を含めます。例えば:
-
ポリシー1
セレクター 演算子 値 ロジック アクション 宛先IP in 10.128.0.7And Allow ユーザーのメール 正規表現に一致 .*@example.com -
ポリシー2
セレクター 演算子 値 アクション 宛先IP in 10.128.0.7Block
ポリシーは数値順 ↗で評価されるため、@example.comで終わるメールを持つユーザーは
10.128.0.7にアクセスでき、他のすべてのユーザーはブロックされます。ネットワークポリシーの構築に関する詳細は、専用のドキュメントを参照してください。 -
-
アプリケーションを追加を選択します。
アプリケーションはアプリケーションページに表示されます。
エンドユーザーは、指定した範囲内の任意のIPアドレスにアクセスすることで、ネットワーク上のHTTPまたはTCPベースのサービスに到達できるようになります。
デバイスが正しく設定されているか確認するには、ユーザーはhttps://help.teams.cloudflare.com/を訪れて、以下を確認できます:
- ページがあなたのネットワークは完全に保護されていますと表示される。
- HTTPフィルタリングで、WARPとGatewayプロキシの両方が有効になっている。
- チーム名がトンネルを作成したZero Trust組織と一致している。
デバイスのローカルIPアドレスを確認し、それがプライベートネットワークのIP/CIDR範囲に含まれないことを確認します。例えば、一部の家庭用ルーターは10.0.0.0/24範囲でDHCP割り当てを行うため、ほとんどの企業のプライベートネットワークで使用される10.0.0.0/8範囲と重複します。ユーザーの家庭ネットワークがトンネル内のルートと同じIPアドレスを共有している場合、そのデバイスはアプリケーションに接続できません。
IPの競合を解決するには、次のいずれかを行うことができます:
-
ユーザーのルーターを再構成して、重複しないIP範囲を使用します。互換性のあるルーターは通常、
192.168.1.0/24、192.168.0.0/24または172.16.0.0/24を使用します。 -
Split Tunnel設定でIP範囲を厳しくして、
10.0.0.0/24範囲を除外します。これは、プライベートネットワーク内に10.0.0.0/24のホストがない場合にのみ機能します。 -
プライベートネットワークのIP/CIDRを変更して、家庭用ネットワークで一般的に使用される範囲と重複しないようにします。