SMB
Server Message Block (SMB) プロトコルは、ユーザーがネットワーク上の共有リソースを読み書きし、アクセスすることを可能にします。セキュリティリスクのため、ファイアウォールやISPは通常、SMBファイル共有への公衆接続をブロックします。Cloudflare Tunnelを使用すると、ネットワーク外のユーザーに対して安全で簡単なSMBアクセスを提供できます。
Cloudflare Zero Trustは、SMBサーバーに接続するための2つのソリューションを提供しています:
SMBはMicrosoft Windows用に開発されましたが、SambaはUNIX系およびBSDシステムからのSMB接続を提供します。Ubuntuマシンでこのガイド ↗を使用してSambaサーバーをセットアップできます。
You can use Cloudflare Tunnel to create a secure, outbound-only connection from your server to Cloudflare’s edge. This requires running the cloudflared daemon on the server. Users reach the service by installing the Cloudflare WARP client on their device and enrolling in your Zero Trust organization. Remote devices will be able to connect as if they were on your private network. By default, all devices enrolled in your organization can access the service unless you build policies to allow or block specific users.
-
ダッシュボードセットアップガイドに従って、サーバー用のCloudflare Tunnelを作成します。アプリケーションの接続ステップをスキップして、ネットワークの接続に直接進むことができます。
-
トンネルのプライベートネットワークタブで、サーバーのプライベートIPアドレス(またはサーバーIPを含む範囲)を入力します。
-
(オプション)サーバーへのアクセスを微調整するために、Zero Trustポリシーを設定します。
To connect your devices to Cloudflare:
- Deploy the WARP client on your devices in Gateway with WARP mode. The Cloudflare certificate is only required if you want to display a custom block page or filter HTTPS traffic.
- Create device enrollment rules to determine which devices can enroll to your Zero Trust organization.
By default, WARP excludes traffic bound for RFC 1918 space ↗, which are IP addresses typically used in private networks and not reachable from the Internet. In order for WARP to send traffic to your private network, you must configure Split Tunnels so that the IP/CIDR of your private network routes through WARP.
-
First, check whether your Split Tunnels mode is set to Exclude or Include mode.
-
If you are using Include mode, add your network’s IP/CIDR range to the list. Your list should also include the domains necessary for Cloudflare Zero Trust functionality.
-
If you are using Exclude mode:
- Delete your network’s IP/CIDR range from the list. For example, if your network uses the default AWS range of
172.31.0.0/16, delete172.16.0.0/12. - Re-add IP/CDIR ranges that are not explicitly used by your private network. For the AWS example above, you would add new entries for
172.16.0.0/13,172.24.0.0/14,172.28.0.0/15, and172.30.0.0/16. This ensures that only traffic to172.31.0.0/16routes through WARP.
- Delete your network’s IP/CIDR range from the list. For example, if your network uses the default AWS range of
By tightening the private IP range included in WARP, you reduce the risk of breaking a user’s access to local resources.
-
Finderメニューで、移動 > サーバーに接続を選択します。
-
smb://<smb-server-ip-address>/sambashareを入力します。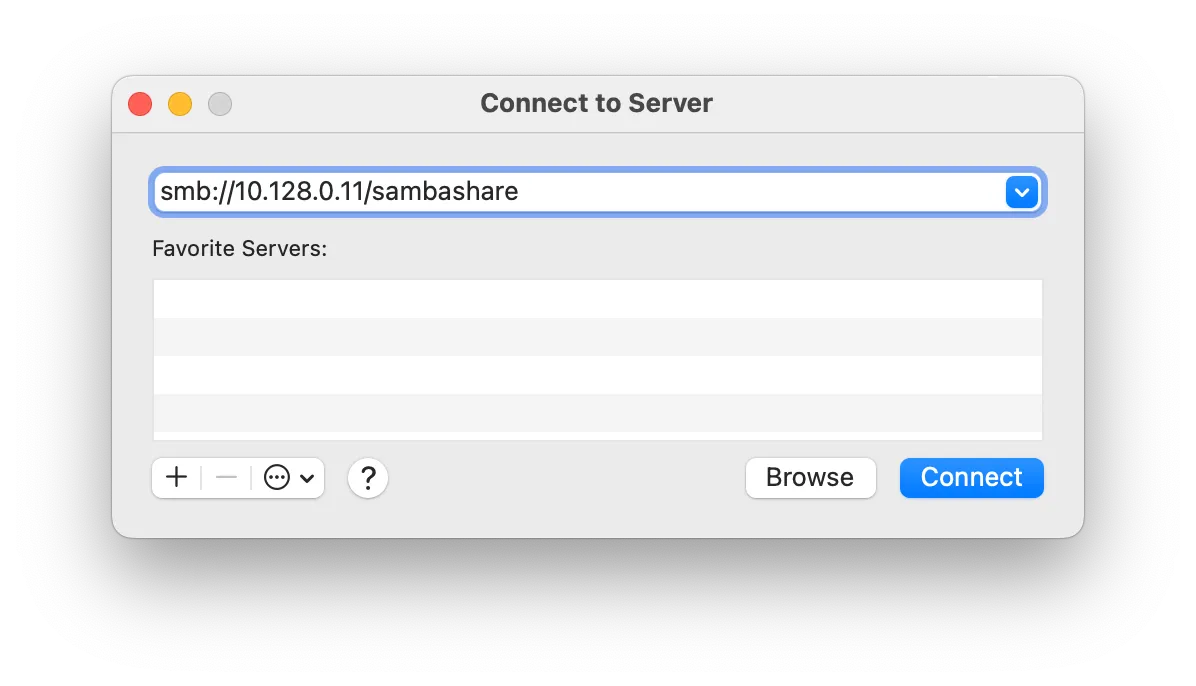
-
サーバー設定時に作成したユーザー名とパスワードでサインインします。
- ファイルエクスプローラーを開き、ネットワークを右クリックしてネットワークドライブの割り当てを選択します。
- フォルダーに
\\<server-private-ip>\sambashareを入力します。 - 異なる資格情報を使用して接続を選択します。
- 完了を選択します。
- サーバー設定時に作成したユーザー名とパスワードでサインインします。
Cloudflare Tunnel can also route applications through a public hostname, which allows users to connect to the application without the WARP client. This method requires having cloudflared installed on both the server machine and on the client machine, as well as an active zone on Cloudflare. The traffic is proxied over this connection, and the user logs in to the server with their Cloudflare Access credentials.
The public hostname method can be implemented in conjunction with routing over WARP so that there are multiple ways to connect to the server. You can reuse the same tunnel for both the private network and public hostname routes.
-
ダッシュボードセットアップガイドに従ってCloudflare Tunnelを作成します。
-
パブリックホスト名タブで、ドロップダウンメニューからドメインを選択し、任意のサブドメインを指定します(例:
smb.example.com)。 -
サービスで_TCP_を選択し、SMBリスニングポートを入力します(例:
localhost:445)。SMBドライブはデフォルトでポート139または445でリッスンします。 -
ホスト名を保存を選択します。
-
(推奨)サーバーへのアクセスを管理するために、Cloudflare Accessに自己ホストアプリケーションを追加します。
-
クライアントマシンに
cloudflaredをインストールします。 -
次のコマンドを実行してSMBリスニングポートを開きます。クライアントマシンで利用可能な任意のポートを指定できます。
Terminal window cloudflared access tcp --hostname smb.example.com --url localhost:8445このコマンドはデスクトップショートカットとしてラップできるため、エンドユーザーはコマンドラインを使用する必要がありません。
-
SMBクライアントを開くし、クライアントを
smb://localhost:8445/sambashareを指すように設定します。ホスト名は入力しないでください。 -
サーバー設定時に作成したユーザー名とパスワードでサインインします。
Windowsマシンを使用していて、SMBのポートを指定できない場合は、ローカルサーバーを無効にする必要があるかもしれません。クライアントマシンのローカルサーバーは、CIFS/SMB用にデフォルトのポート445を使用します。そのポートでリッスンすることで、ローカルサーバーはcloudflare access接続をブロックできます。
Windowsマシンでローカルサーバーを無効にするには:
- Win+Rを選択して実行ウィンドウを開きます。
services.mscと入力し、Enterを選択します。- おそらく
Serverと呼ばれるローカルサーバープロセスを見つけます。 - サービスを停止し、スタートアップの種類を_無効_に設定します。
TCP/IP NetBIOS Helperについても、手順3と4を繰り返します。