3 - ジャンクメールと管理者の隔離
このチュートリアルでは、SUSPICIOUSおよびBULKメッセージをユーザーのジャンクメールフォルダーに配信し、MALICIOUS、SPAM、およびSPOOFメッセージを管理者の隔離に配信する方法を学びます(これには、管理者がメールを解放する必要があります)。
You first need to configure the domains you are onboarding on the Email Security (formerly Area 1) dashboard. To configure your domains:
- Log in to the Email Security dashboard ↗.
- Go to Settings (the gear icon).
- Go to Email configuration > Domains & Routing > Domains.
- Make sure each domain you are onboarding has been added.
- For each domain you are configuring, select … > Edit, and set the following options:
- Domain -
<YOUR_DOMAIN>. - Configured as -
MX Records. - Forwarding to - This should match the expected MX record for each domain in your Office 365 account ↗.
- IP Restrictions - Leave this field empty.
- Outbound TLS -
Forward all messages over TLS. - Quarantine Policy - いかなる処分も確認しない。
- Domain -
To create quarantine policies:
-
Open the Microsoft 365 Defender console ↗
-
Go to Email & collaboration > Policies & rules.
-
Select Threat policies.
-
Under Rules, select Quarantine policies.
-
Select Add custom policy.
-
Set the Policy name to
UserNotifyAdminRelease. -
Select Next.
-
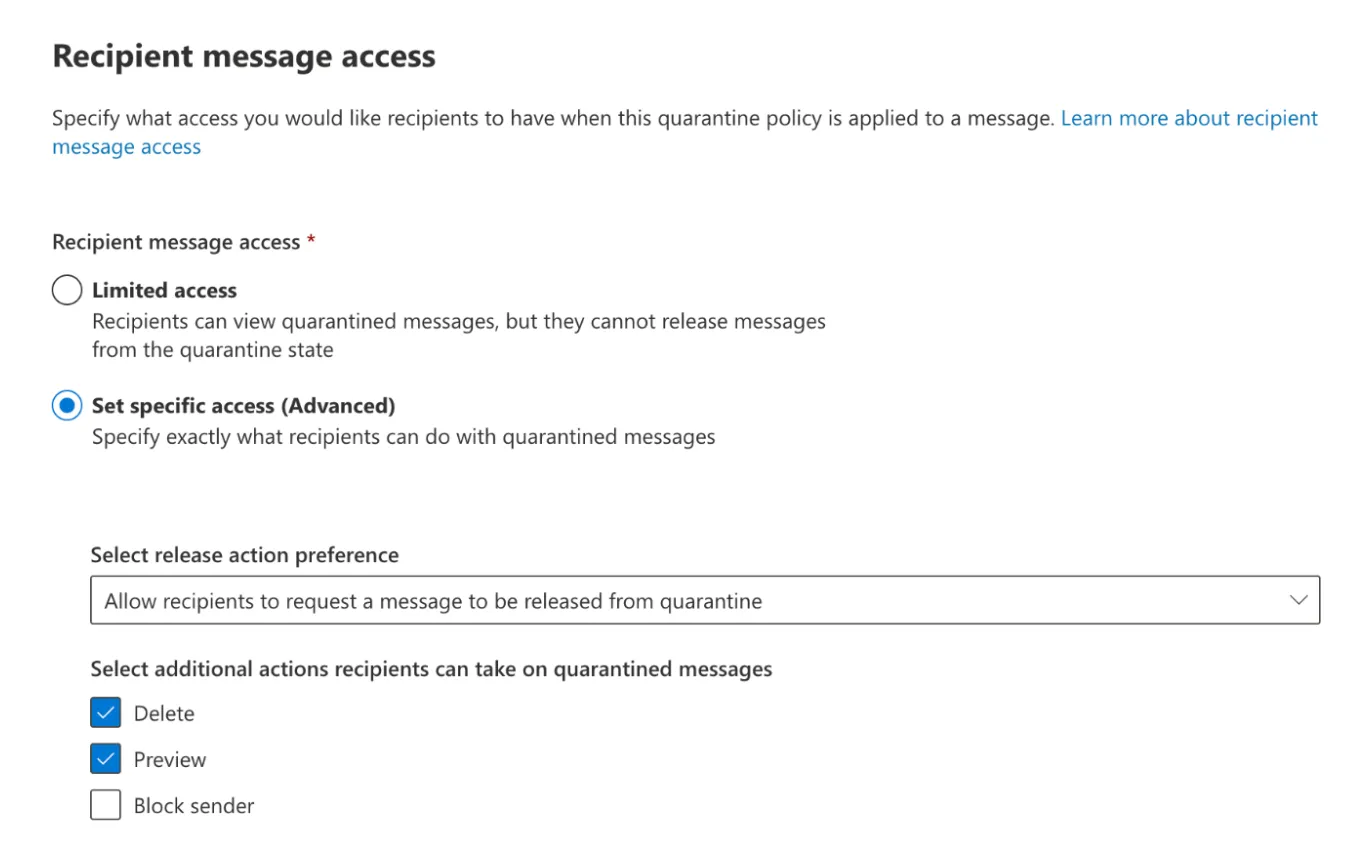
In Recipient message access, select Set specific access (Advanced), and then:
- In Select release action preference, choose Allow recipients to request a message to be released from quarantine.
- In Select additional actions recipients can take on quarantined messages, select the Delete and Preview checkboxes.
-
Select Next.
-
In Quarantine notification, select Enable.
-
Select Next.
-
Review your settings and select Submit.
-
Select Done.
To configure quarantine notifications:
-
Open the Microsoft 365 Defender console ↗.
-
Go to Email & collaboration > Policies & rules.
-
Select Threat policies.
-
Under Rules, select Quarantine policies.
-
Select Global settings.
-
Scroll to the bottom and set the desired frequency in Send end-user spam notifications every (days). This value can only be incremented in days.
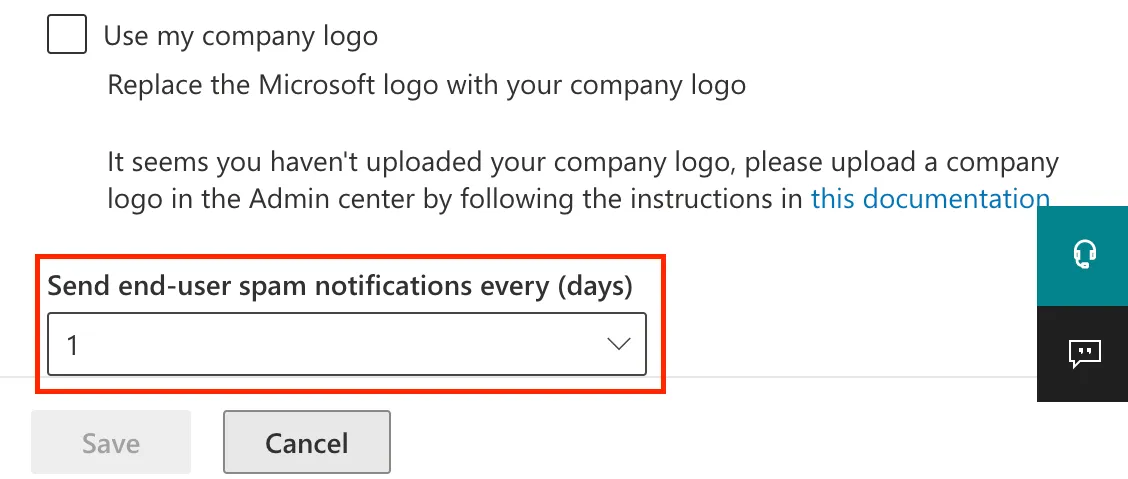
-
Select Save.
To configure anti-spam policies:
-
Open the Microsoft 365 Defender console ↗.
-
Go to Email & collaboration > Policies & rules.
-
Select Threat policies.
-
Under Policies, select Anti-spam.
-
Select the Anti-spam inbound policy (Default) text (not the checkbox).
-
In Actions, scroll down and select Edit actions.
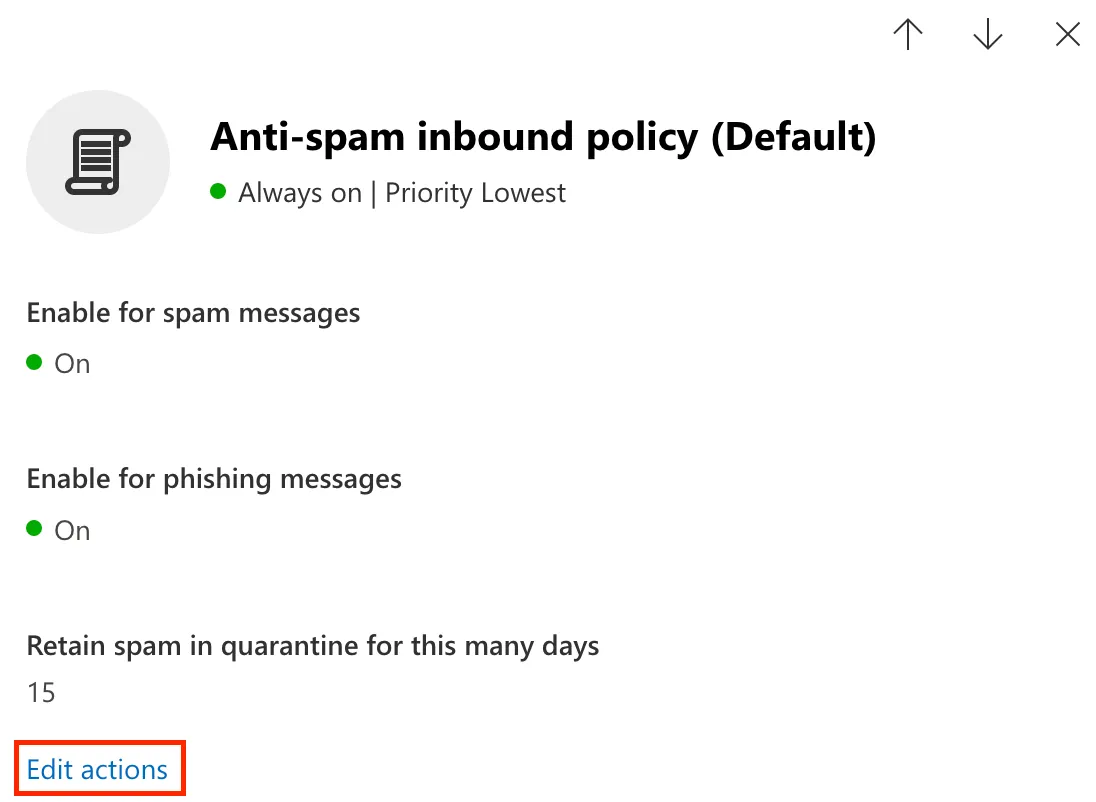
-
Set the following conditions and actions (you might need to scroll up or down to find them):
- Spam: Move messages to Junk Email folder.
- High confidence spam: Quarantine message.
- Select quarantine policy: _UserNotifyAdminRelease_.
- Phishing: Quarantine message.
- Select quarantine policy: _UserNotifyAdminRelease_.
- High confidence phishing: Quarantine message.
- Select quarantine policy: _UserNotifyAdminRelease_.
- Retain spam in quarantine for this many days: Default is 15 days. Email Security (formerly Area 1) recommends 15-30 days.

-
Select Save.
To create the transport rules that will send emails with certain dispositions to Email Security:
-
Open the new Exchange admin center ↗.
-
Go to Mail flow > Rules.
-
Select Add a Rule > Create a new rule.
-
Set the following rule conditions:
- Name: `エリア 1 ジャンクメールフォルダーに配信`.
- Apply this rule if: The message headers > includes any of these words.
- Enter text:
X-Area1Security-Disposition> Save. - Enter words:
`SUSPICIOUS`, `BULK`> Add > Save.
- Enter text:
- Apply this rule if: Select + to add a second condition.
- And: The sender > IP address is in any of these ranges or exactly matches > enter the egress IPs in the Egress IPs page.
- Do the following - _メッセージプロパティを変更_ > _スパム信頼度レベル (SCL) を設定_ > _5_.
-
Select Next.
-
You can use the default values on this screen. Select Next.
-
Review your settings and select Finish > Done.
-
Select the rule `エリア 1 ジャンクメールフォルダーに配信` you have just created, and Enable.
-
Select Add a Rule > Create a new rule.
-
Set the following rule conditions:
- Name: `エリア 1 ユーザー隔離メッセージ`.
- Apply this rule if: The message headers > includes any of these words.
- Enter text:
X-Area1Security-Disposition> Save. - Enter words: `MALICIOUS`, `UCE`, `SPOOF` > Add > Save.
- Enter text:
- Apply this rule if: Select + to add a second condition.
- And: The sender > IP address is in any of these ranges or exactly matches > enter the egress IPs in the Egress IPs page.
- Do the following: _メッセージプロパティを変更_ > _スパム信頼度レベル (SCL) を設定_ > _9_.
-
Select Next.
-
You can use the default values on this screen. Select Next.
-
Review your settings and select Finish > Done.
-
Select the rule `エリア 1 ユーザー隔離メッセージ` you have just created, and select Enable.