Gmailの取り消し
このチュートリアルでは、Gmailのメール取り消しを設定する方法を学びます。
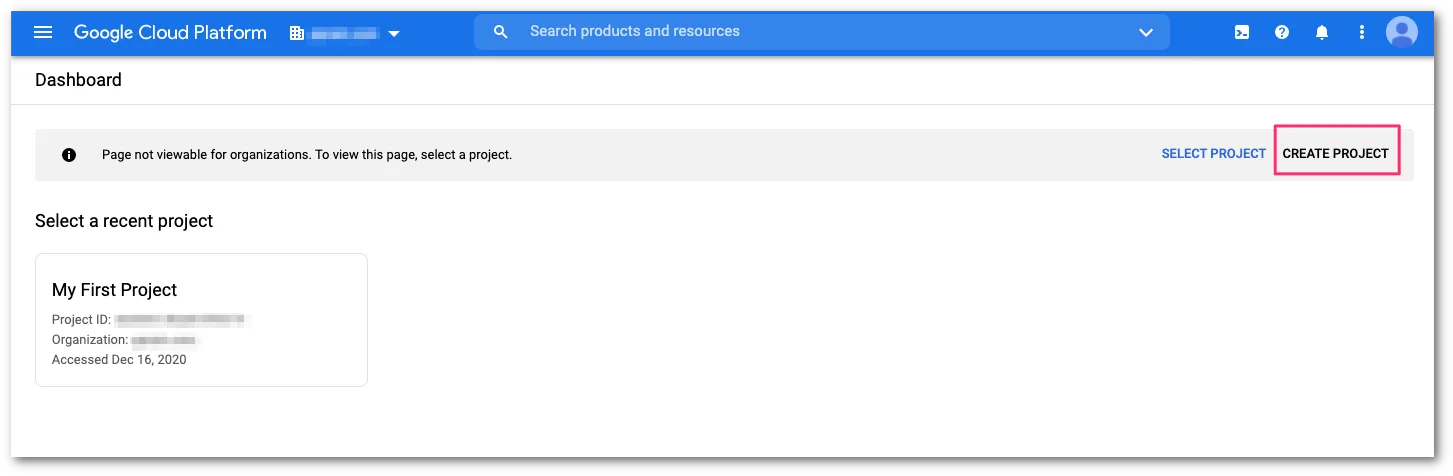
Email SecurityがGmailの受信トレイからメッセージを取り消すためには、まずGoogle Cloud Platform(GCP)プロジェクトにサービスアカウントを作成する必要があります。
-
Google Cloud Console ↗にアクセスします。ダッシュボードからCREATE PROJECTを選択します。
-
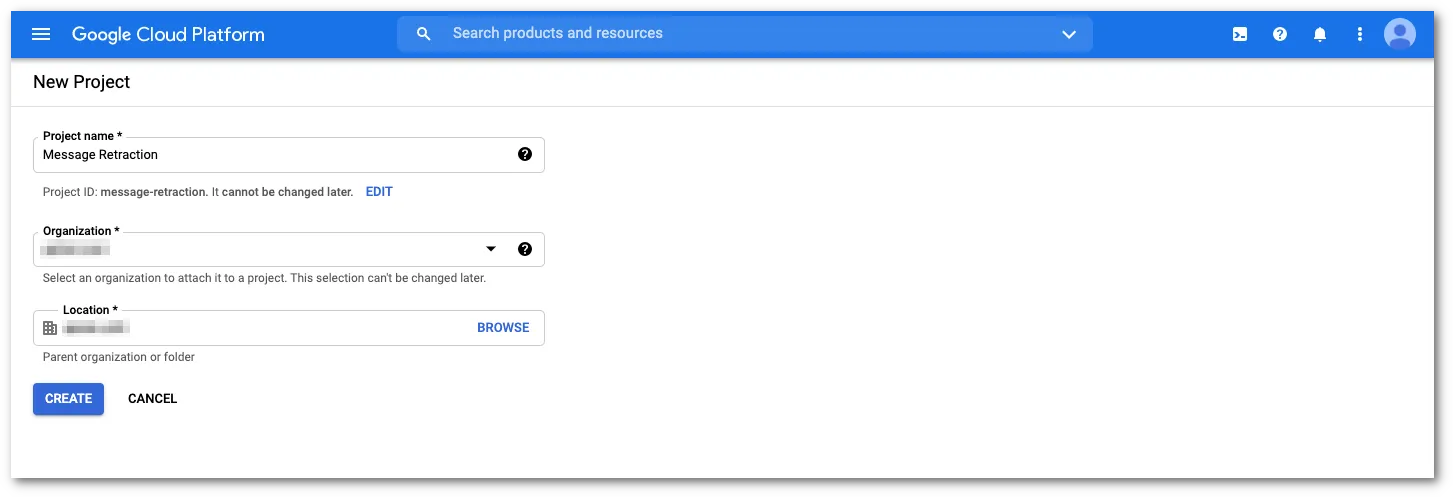
新しいプロジェクトの詳細を入力し、CREATEを選択して新しいプロジェクトを開始します。
-
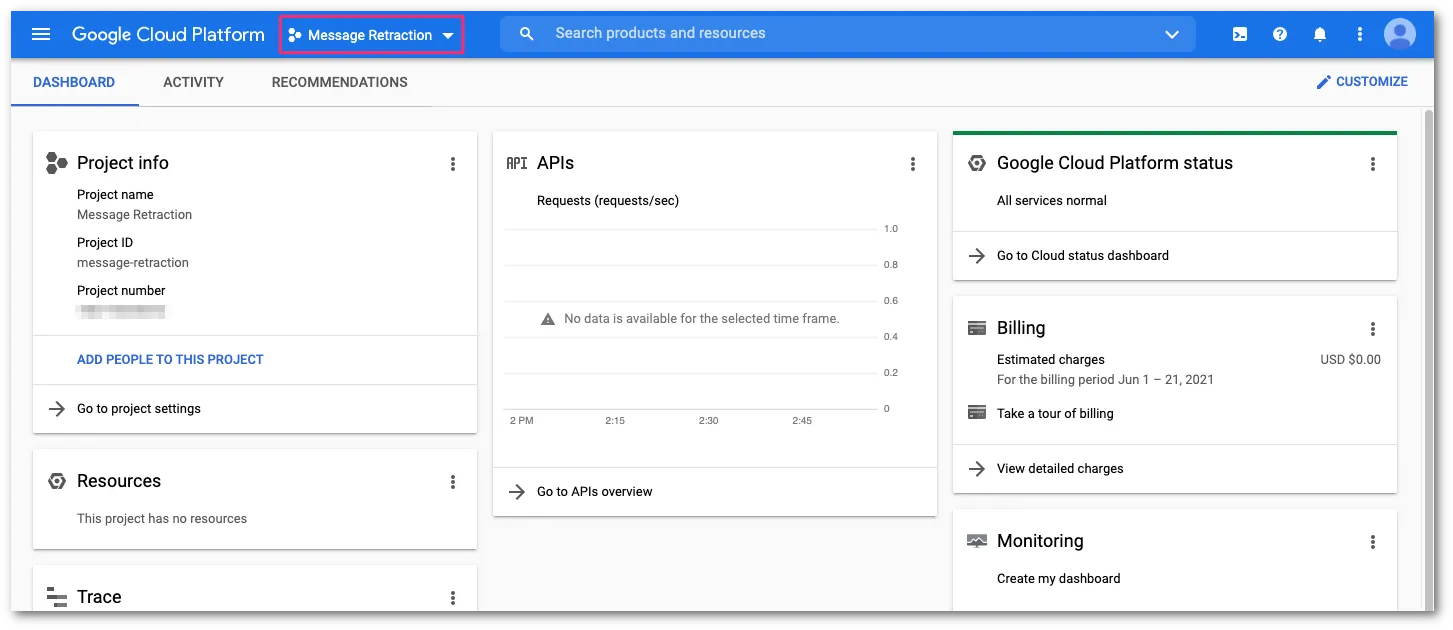
新しいプロジェクトが作成されると、GCPコンソールは自動的にプロジェクトコンソールにリダイレクトされます。リダイレクトされない場合は、Project selectorを使用して作成したプロジェクトに切り替えます。
-
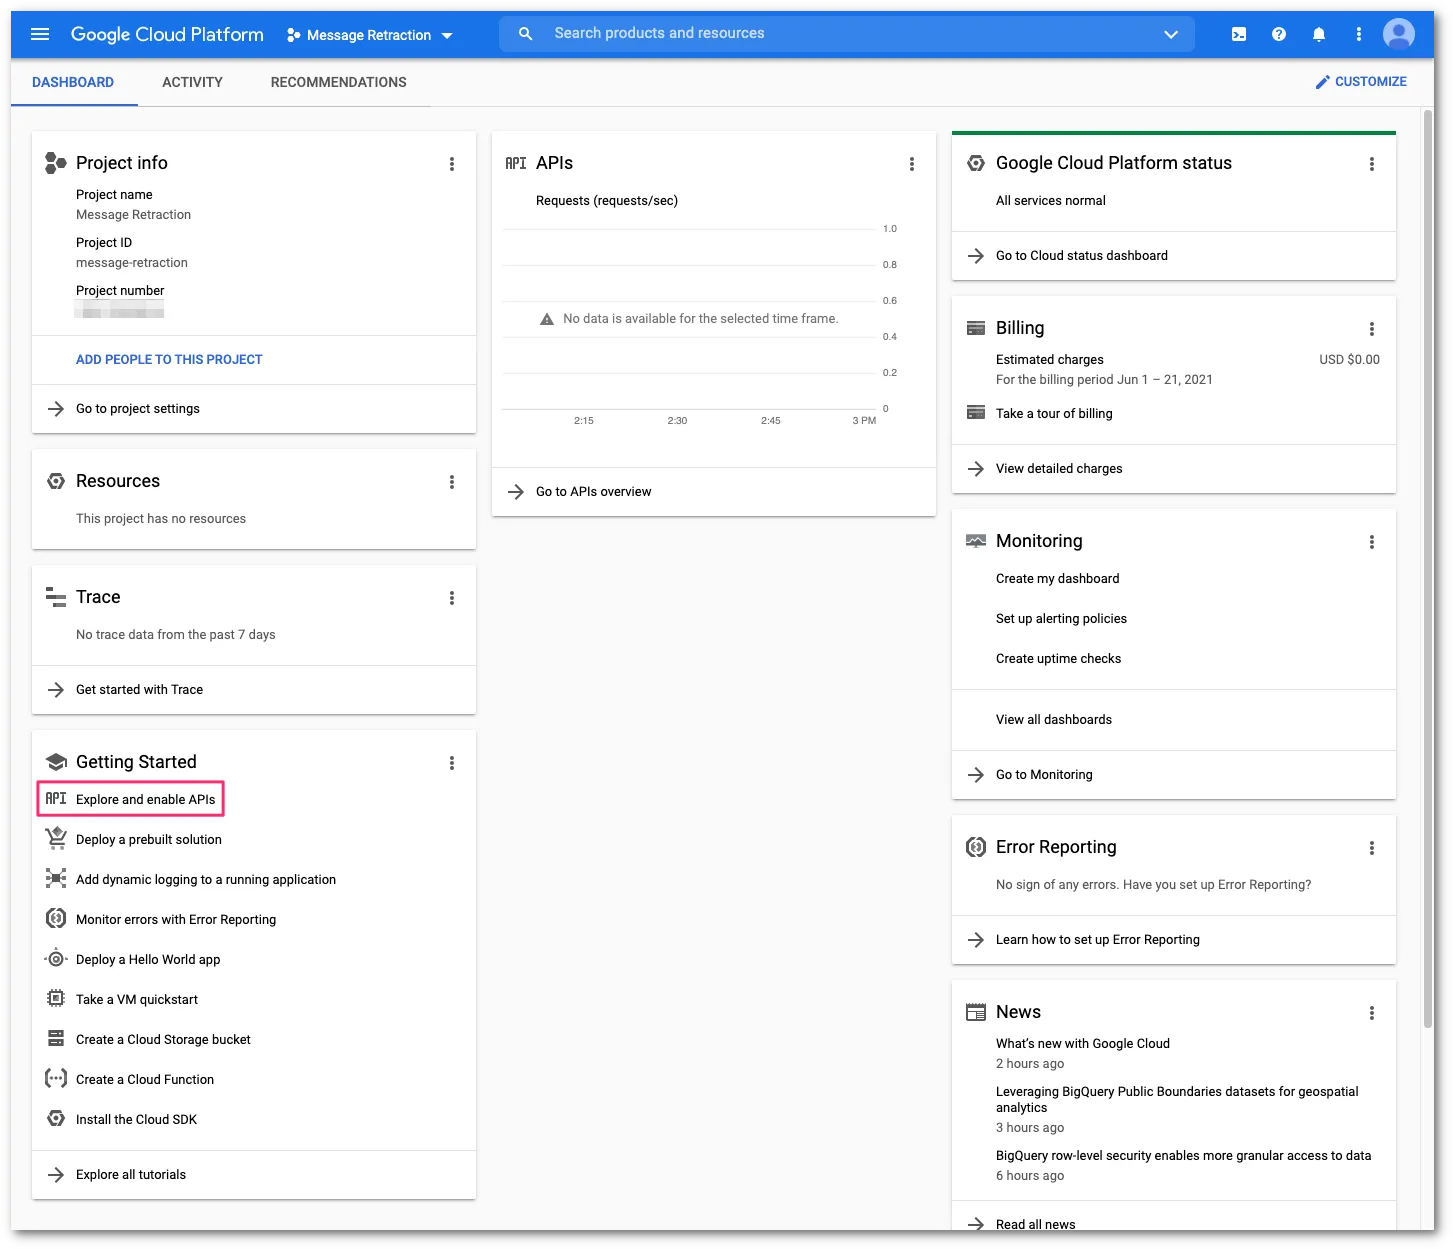
Getting Startedカードで、Explore and enable APIsを選択してAPIとサービスの設定コンソールにアクセスします。
-
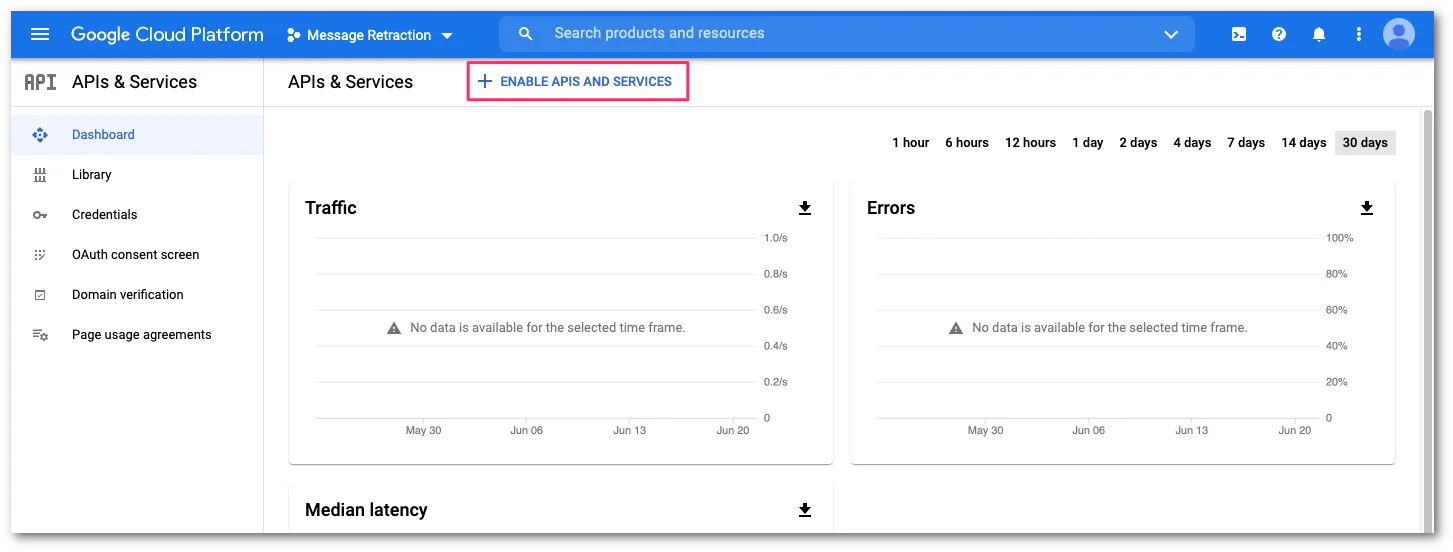
ENABLE APIS AND SERVICESを選択してAPIライブラリを開きます。
-
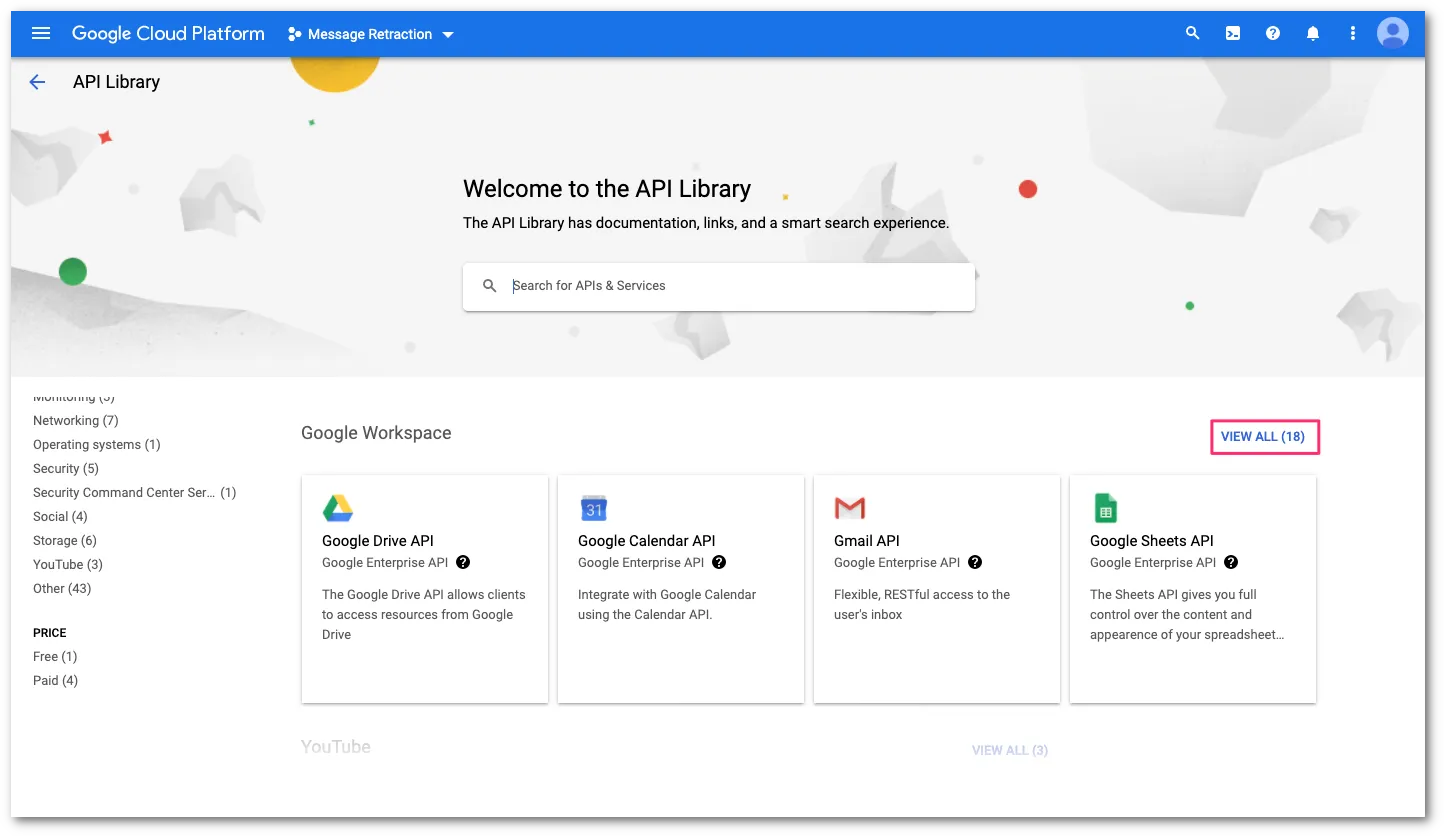
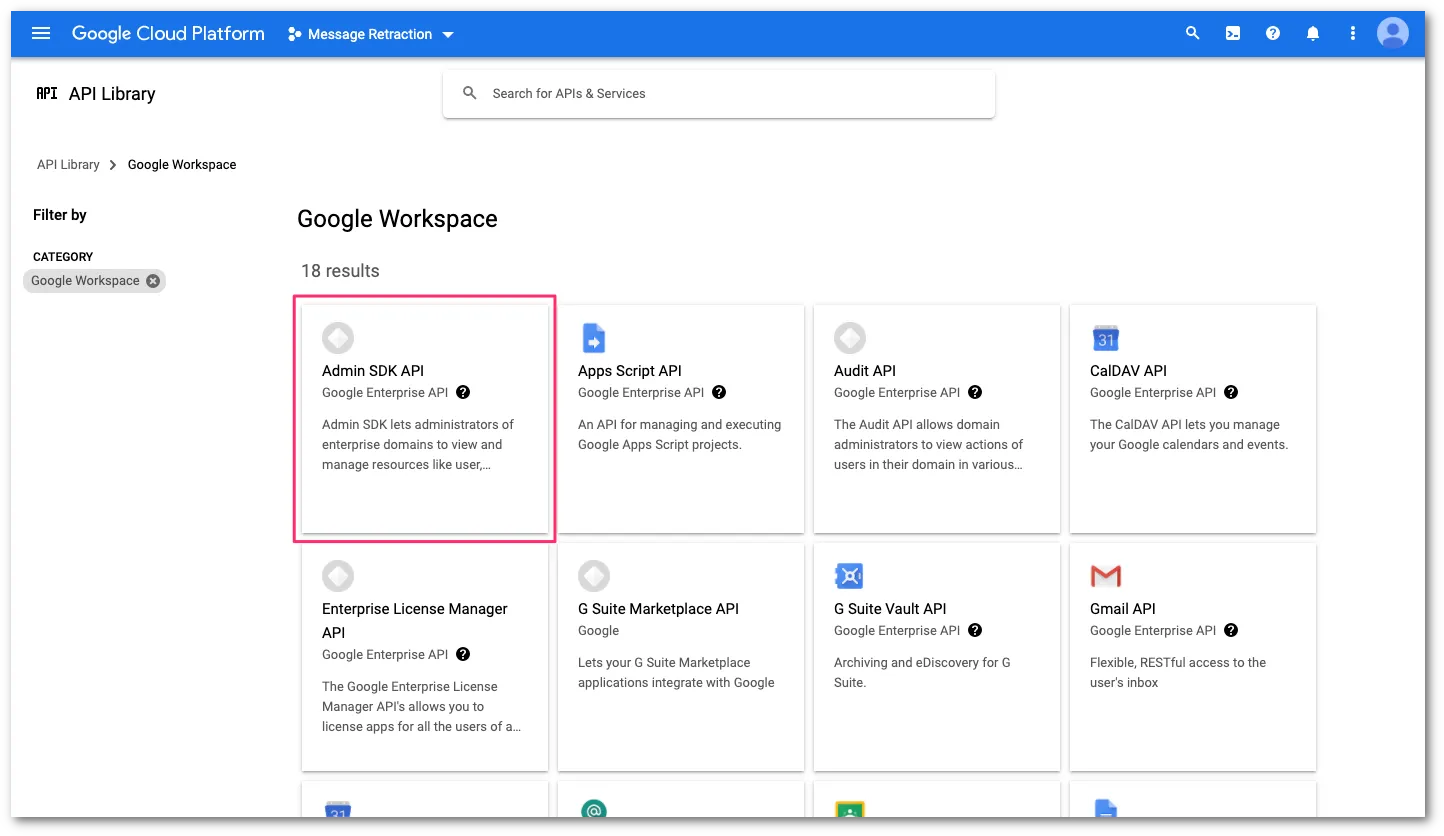
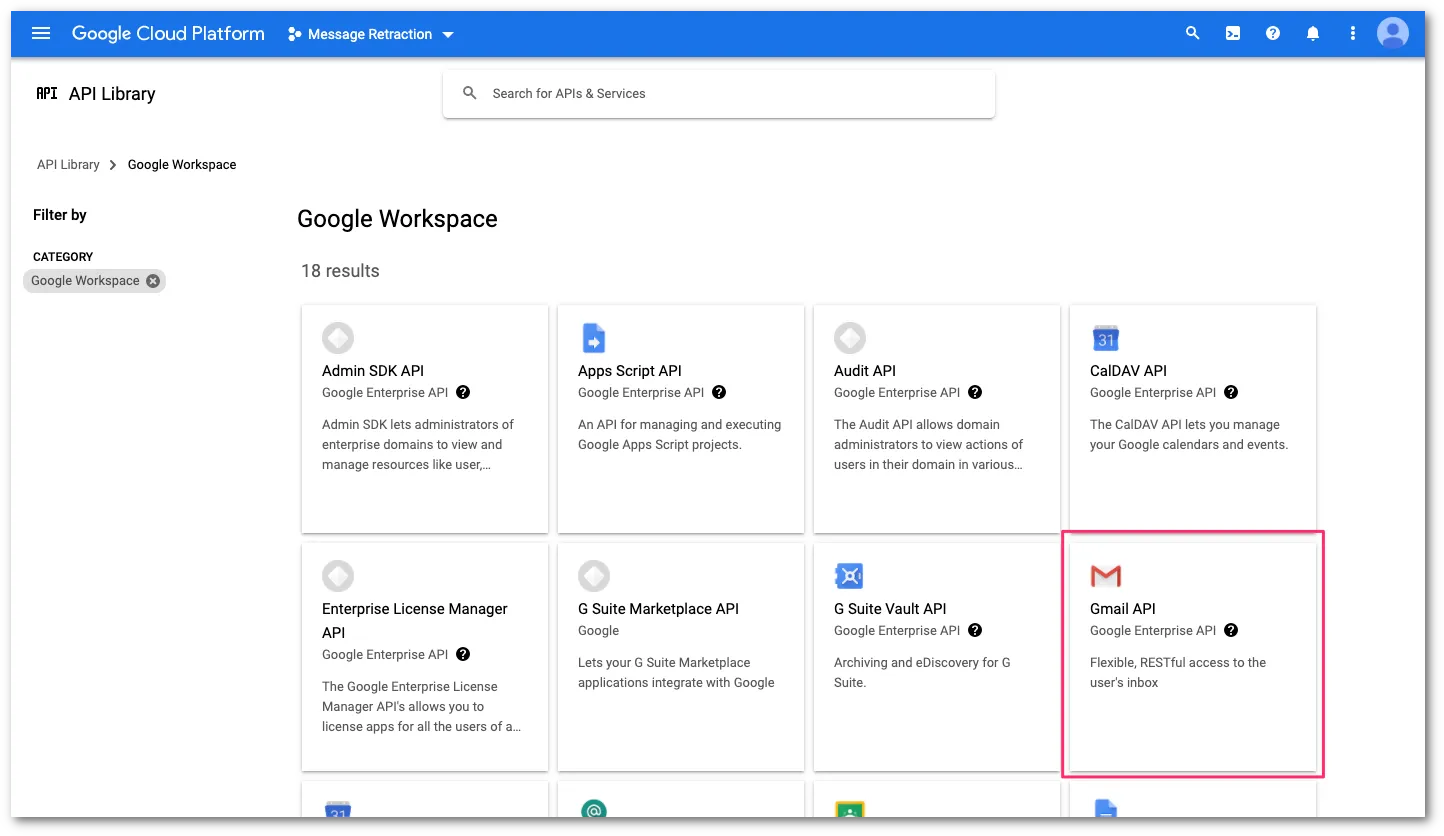
Admin SDK APIとGmail APIを有効にする必要があります。APIライブラリで、Google Workspaceセクションを見つけます。次に、View Allを選択してGoogle Workspaceのすべての利用可能なAPIにアクセスします。
-
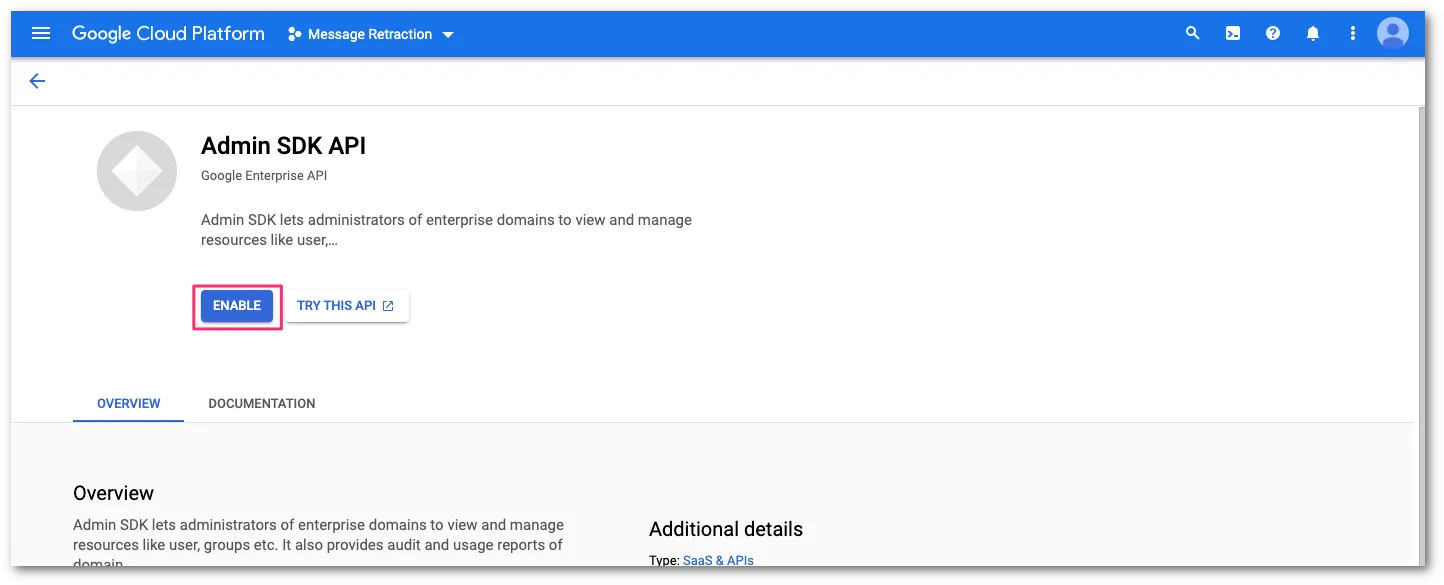
Admin SDK APIを選択します。
-
Enableを選択してAdmin SDK APIを有効にします。
-
Google Workspace APIライブラリに戻り、Gmail APIを選択します。
-
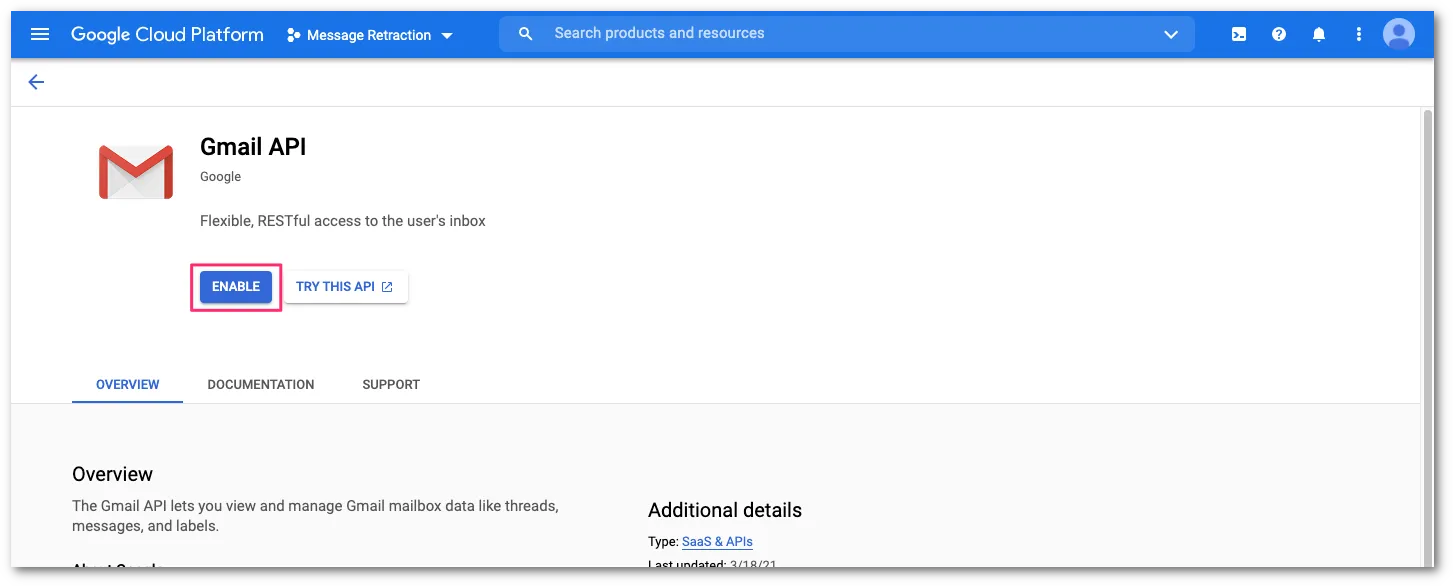
ENABLEを選択してGmail APIを有効にします。
-
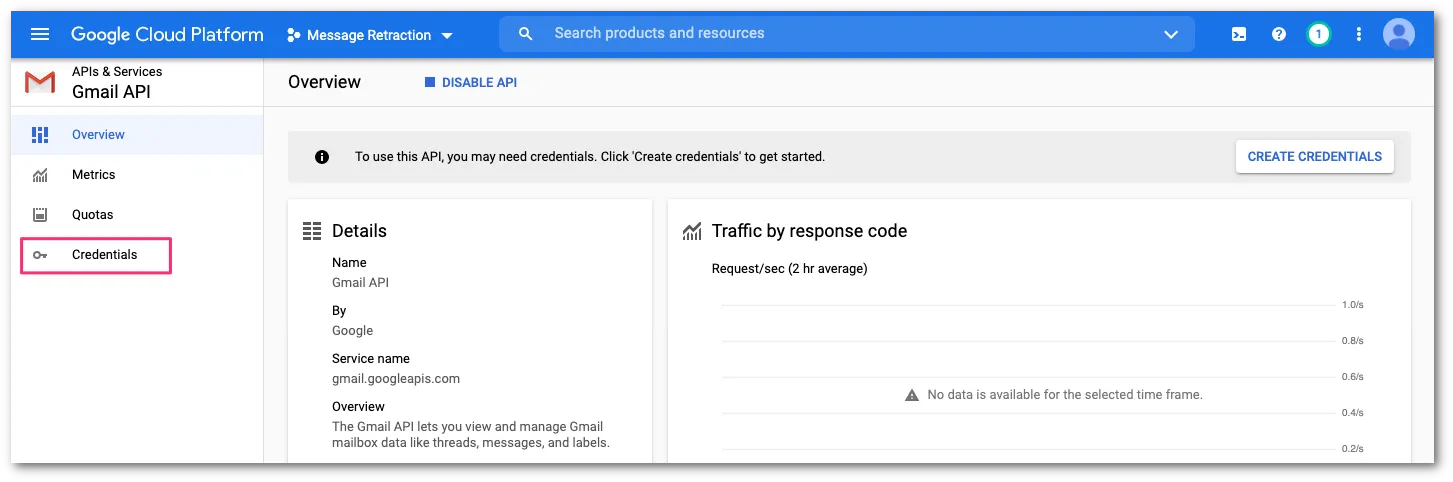
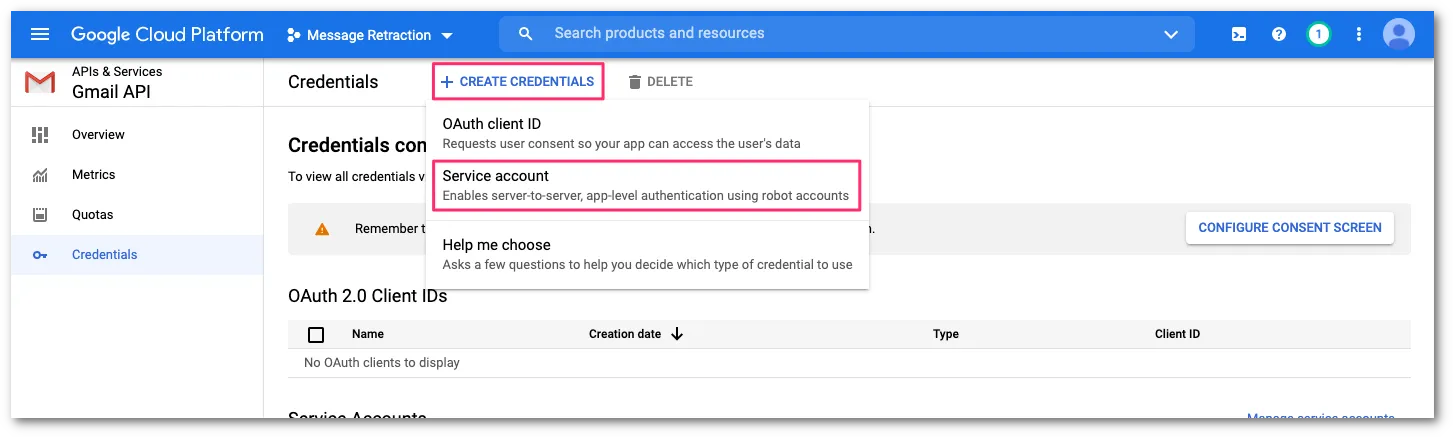
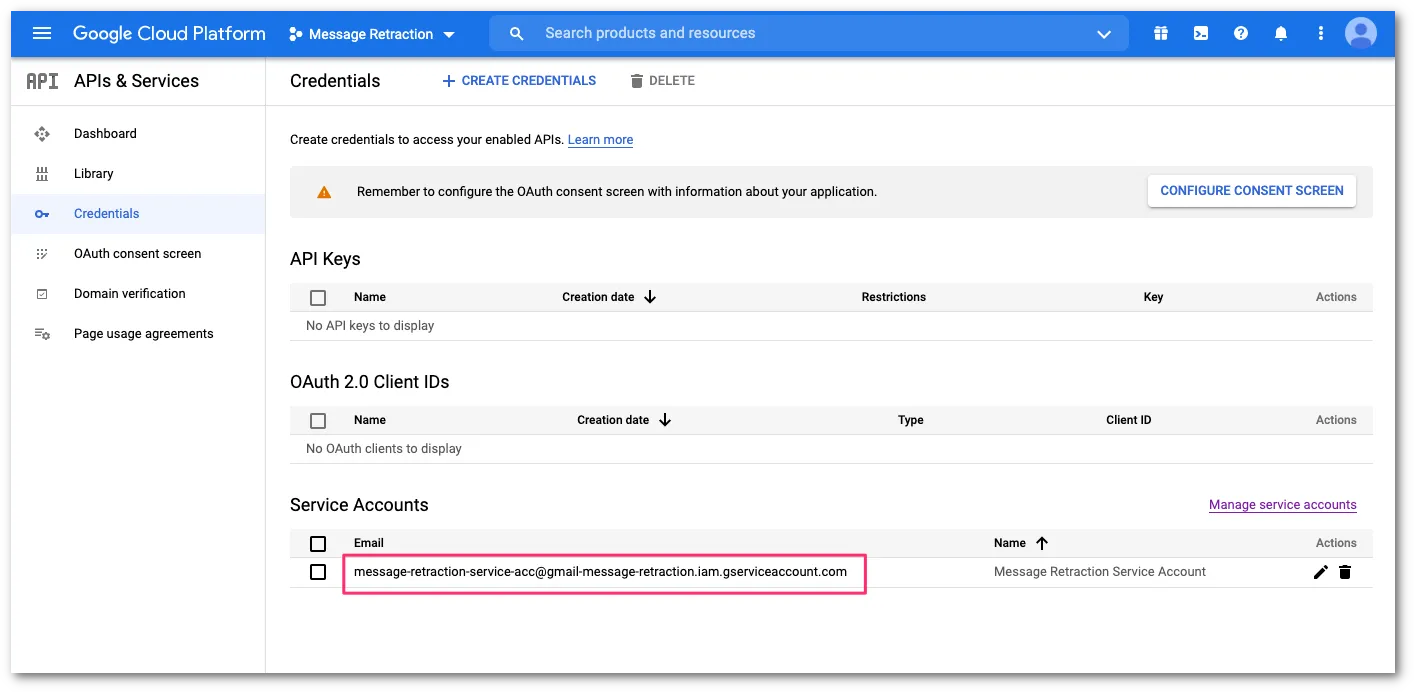
APIを使用するためのサービスアカウントを作成します。Gmail API consoleからCredentialsを選択します。
-
CREATE CREDENTIALS > Service accountを選択します。
-
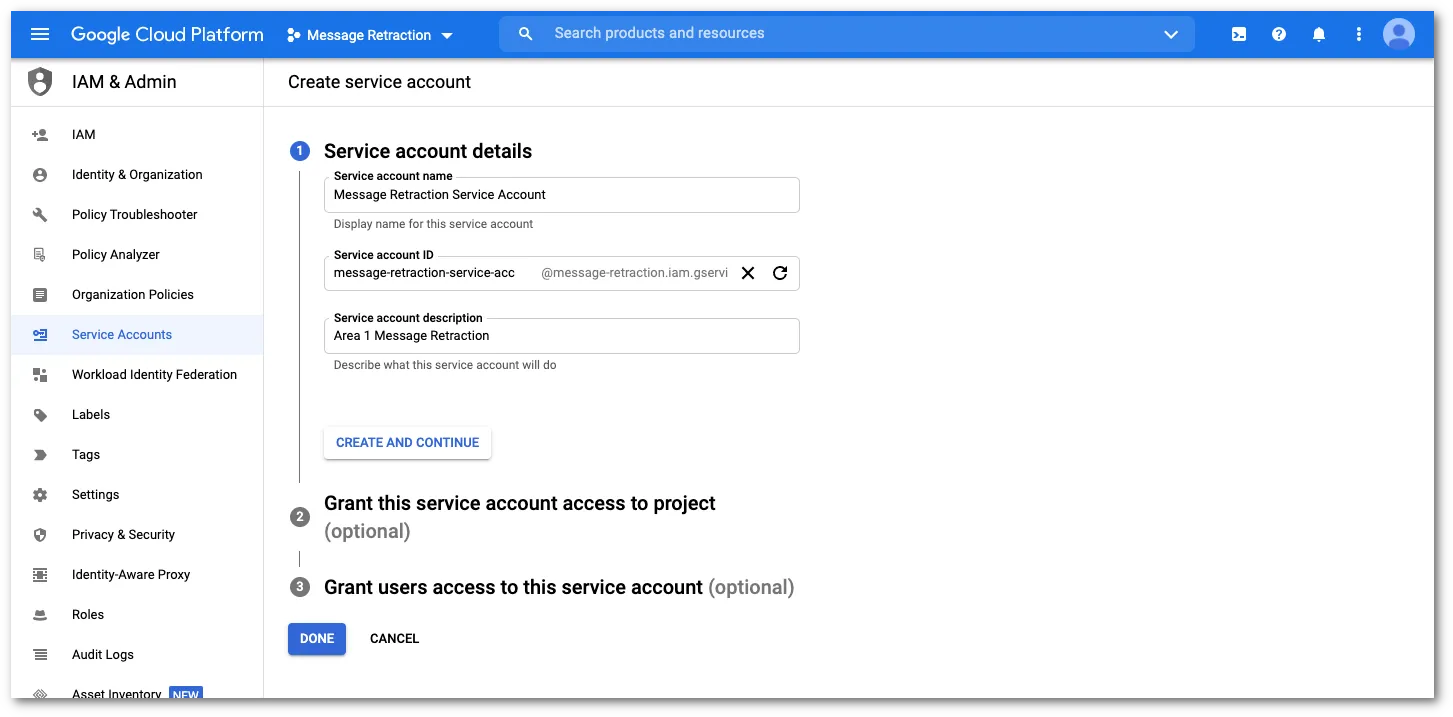
Service account detailsに以下の情報を提供します:
- Service account name:
Message Retraction Service Account - Service account ID: この値は自動的に生成されます。
- Service account description: このサービスの説明。例えば、
Email Security Message Retraction
完了したらCREATE AND CONTINUEを選択します。
- Service account name:
-
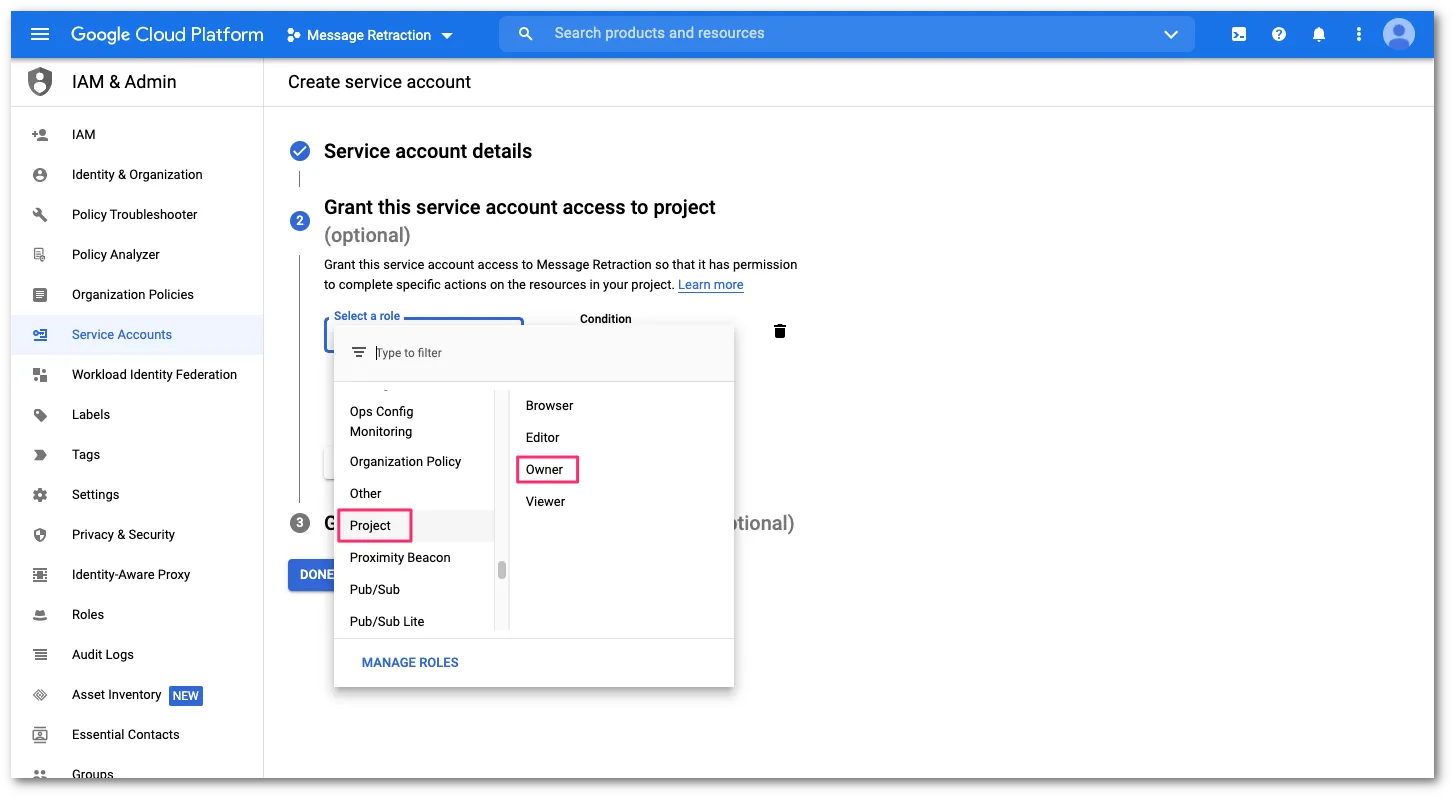
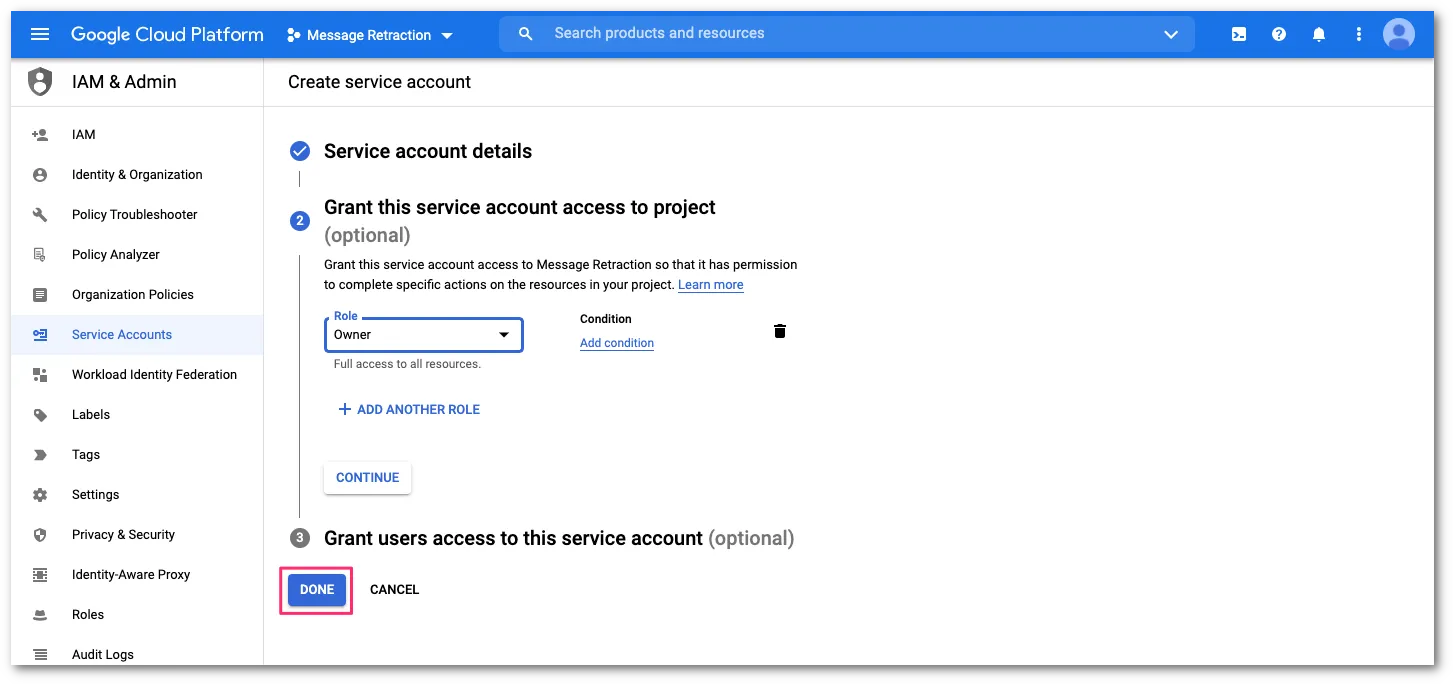
Grant this service account access to projectで、Select a roleドロップダウンメニューを選択します。次に、左の列でProjectを選択し、右の列でOwnerを選択します。
-
役割が割り当てられたら、DONEを選択して設定を完了します。
-
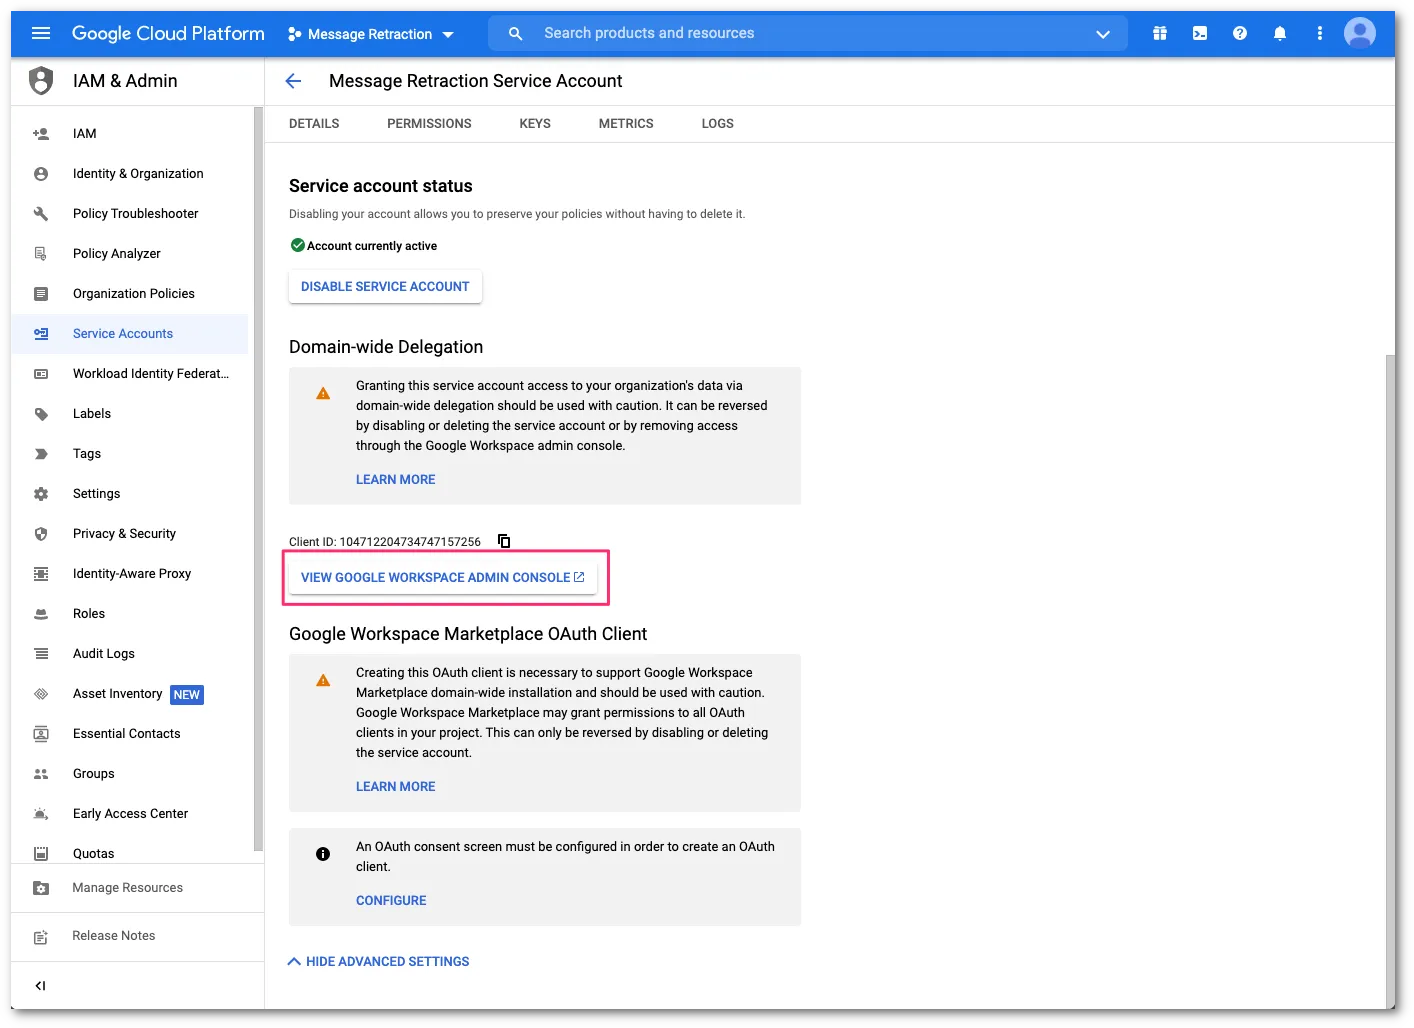
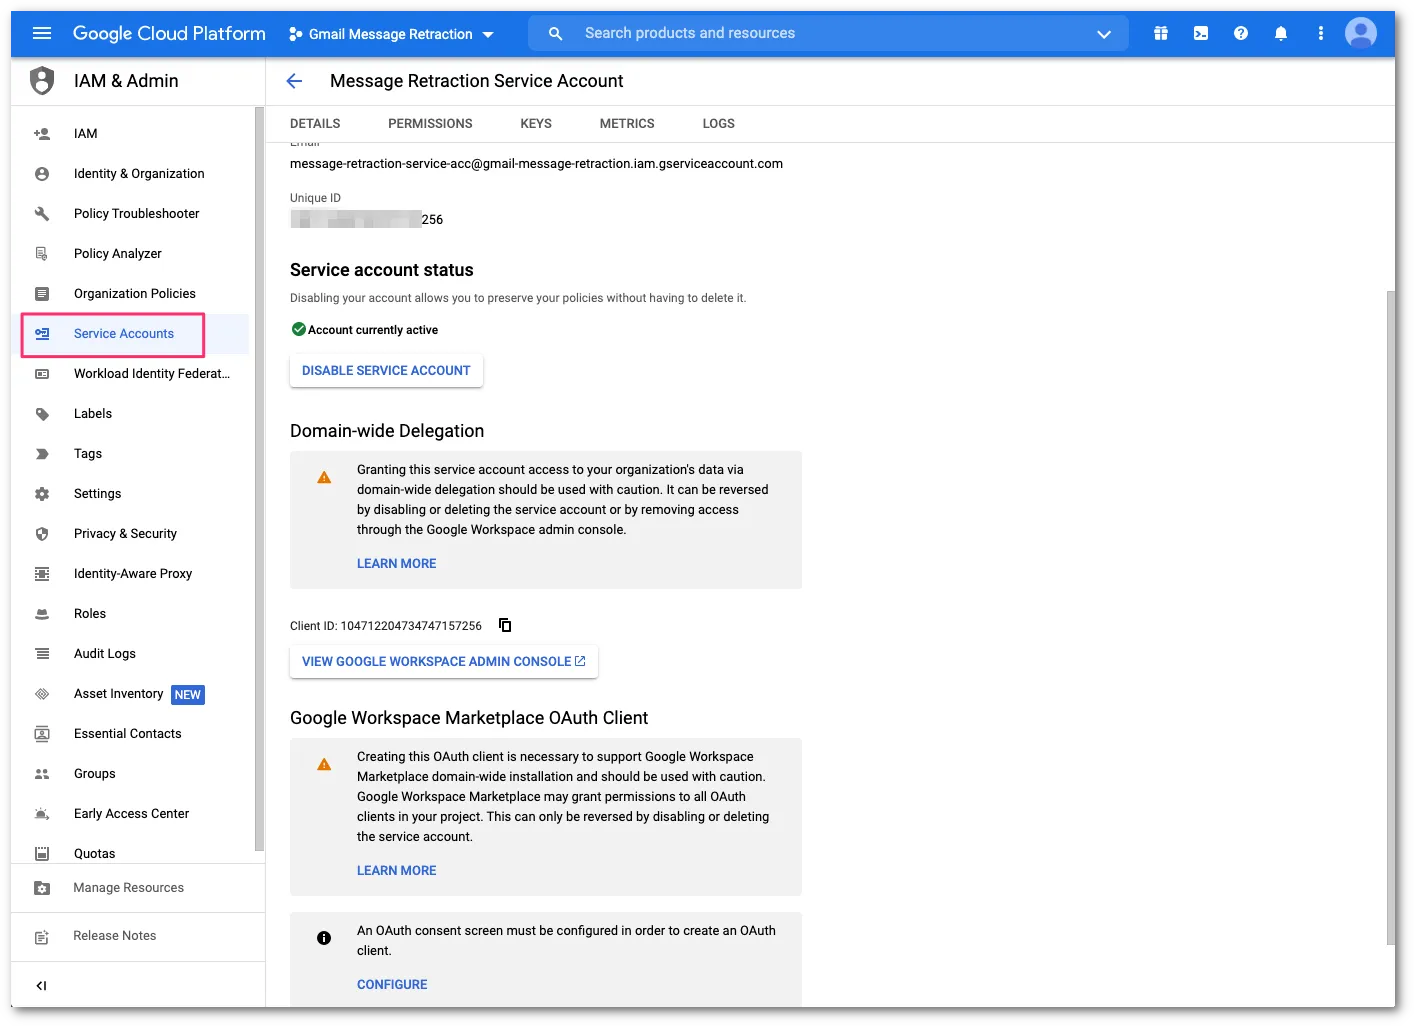
役割の割り当てが保存されると、API資格情報設定コンソールに戻ります。Service Accountsで、新しく作成したサービスアカウントを選択してドメイン全体の委任を設定します。
-
Detailsで、Unique IDをメモします。次に、SHOW ADVANCED SETTINGSを選択します。

-
VIEW GOOGLE WORKSPACE ADMIN CONSOLEを選択してドメイン全体の委任を設定します。これにより、Google管理コンソールの新しいウィンドウが開きます。
-
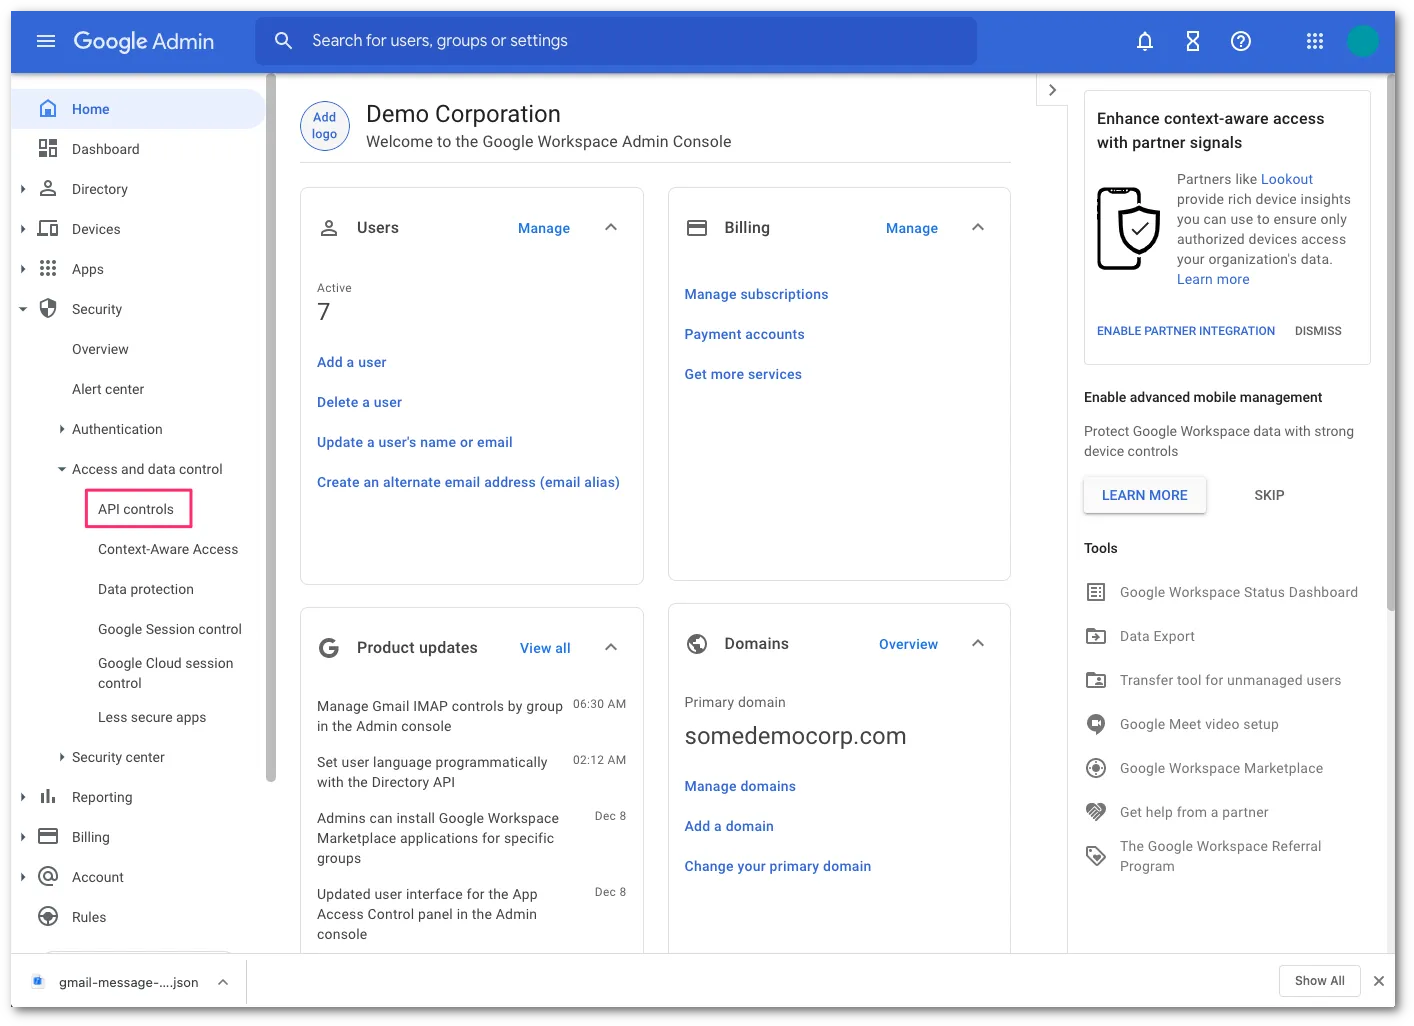
Security > Access and data control > API controlsに移動します。
-
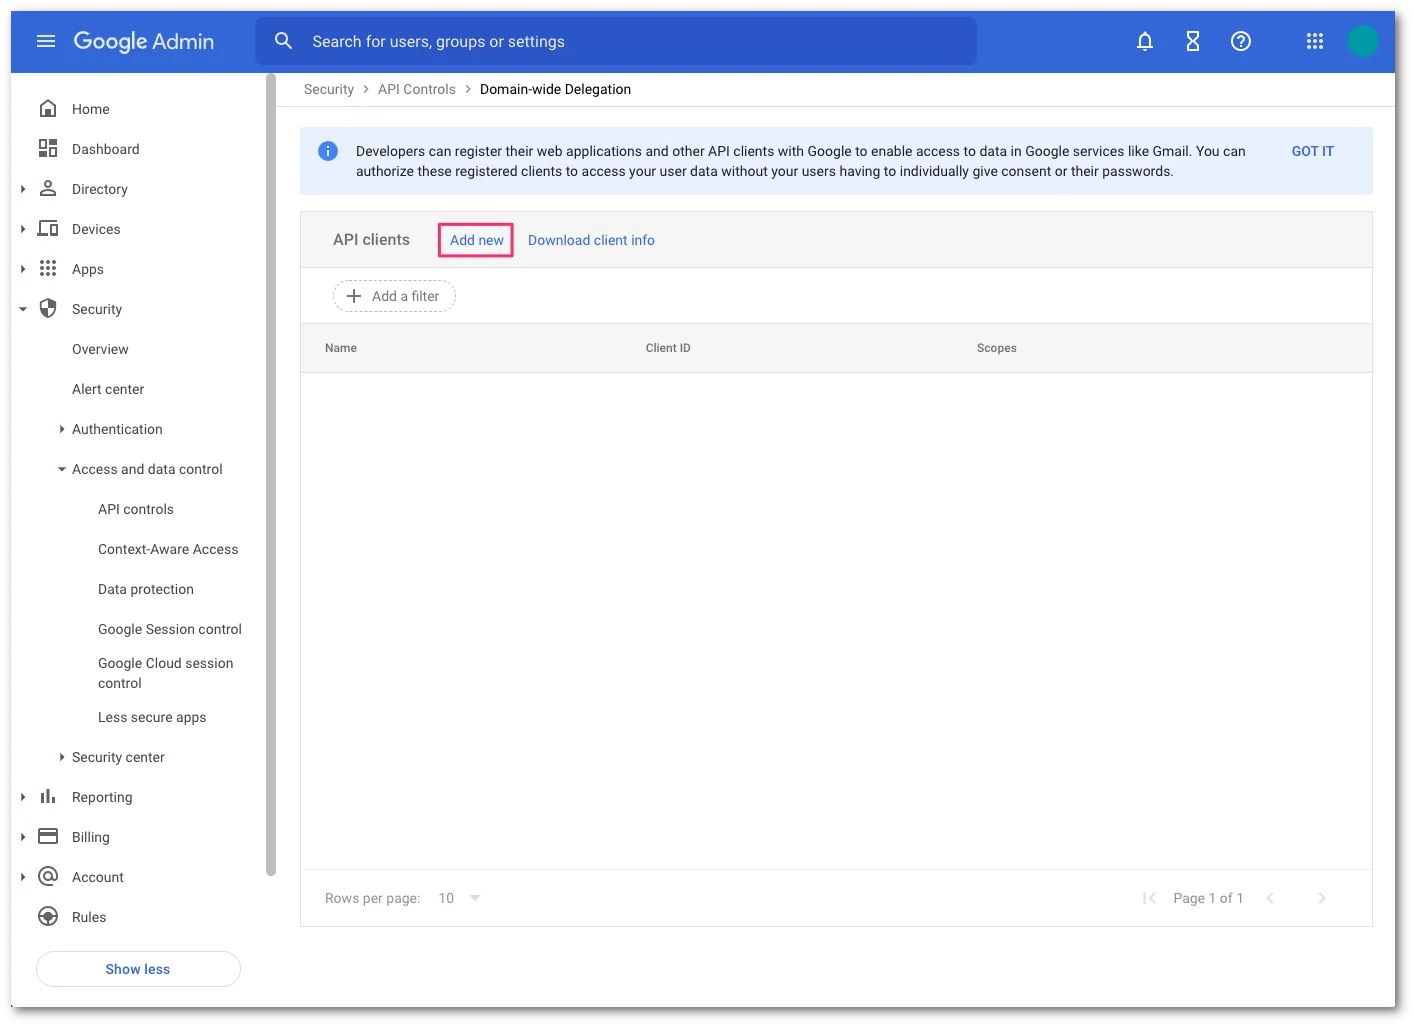
Domain wide delegationセクションを見つけ、MANAGE DOMAIN WIDE DELEGATIONを選択します。

-
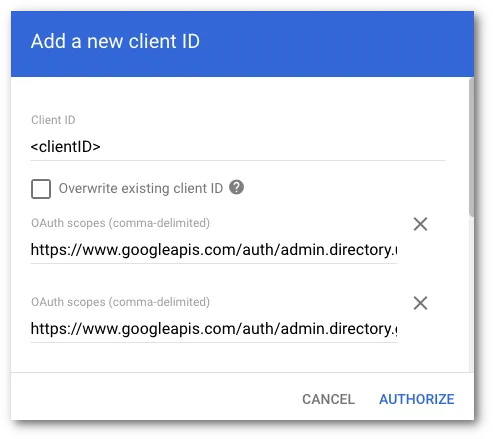
Add newを選択して新しいクライアントIDを追加します。
-
Add a new client IDで、以下の情報を入力します:
- Client ID: クライアントIDを入力します。これはステップ17で保存したUnique IDの値です。
- OAuth scopes: 以下の情報を入力します(入力フィールドはカンマ区切りの値を受け入れます):
https://www.googleapis.com/auth/admin.directory.user.readonly, https://www.googleapis.com/auth/admin.directory.group.readonly, https://www.googleapis.com/auth/admin.directory.user.alias.readonly, https://www.googleapis.com/auth/gmail.labels, https://mail.google.com/完了したらAUTHORIZEを選択します。
-
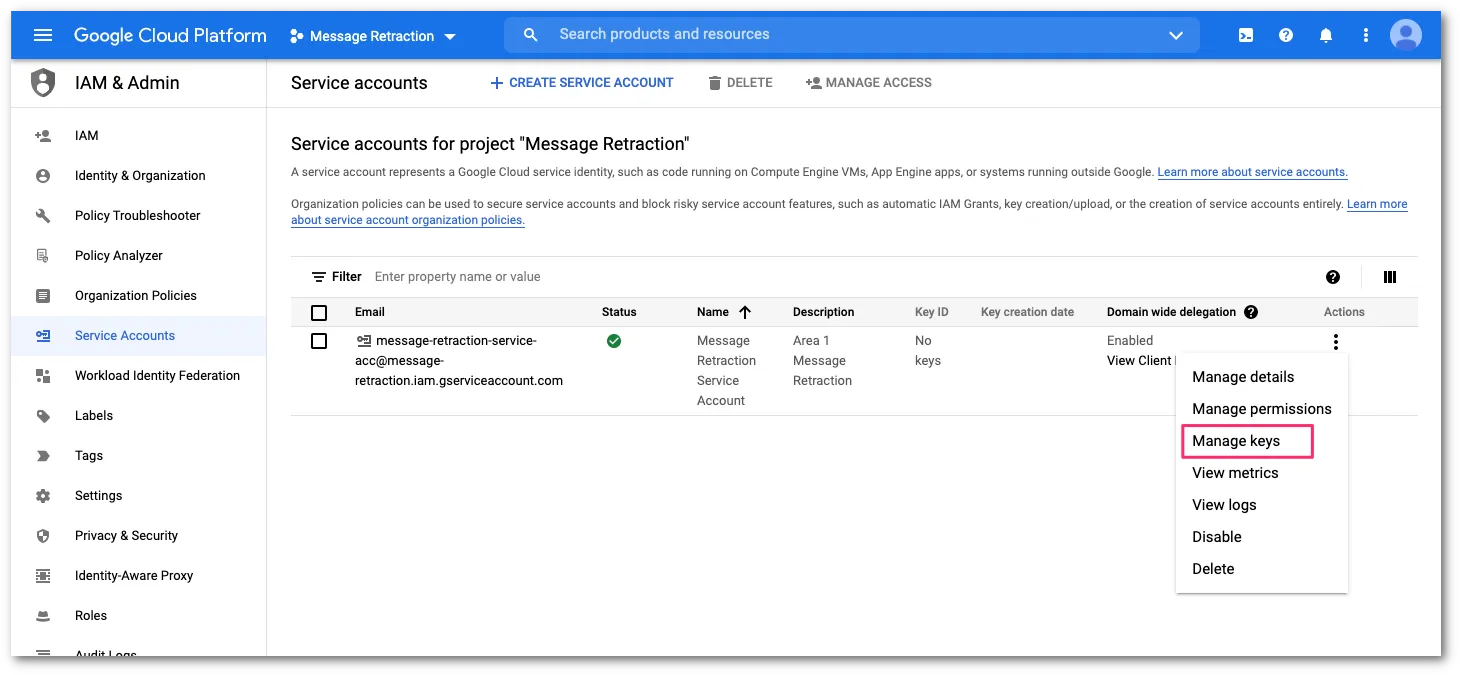
Google Cloud Platform(GCP)コンソールに戻り、IAM & Admin > Service Accountsを選択してサービスアカウント画面に戻ります。
-
サービスアカウント設定パネルでAPIキーを作成する必要があります。三点リーダーボタンを選択してメニューを開き、次にManage keysを選択します:
-
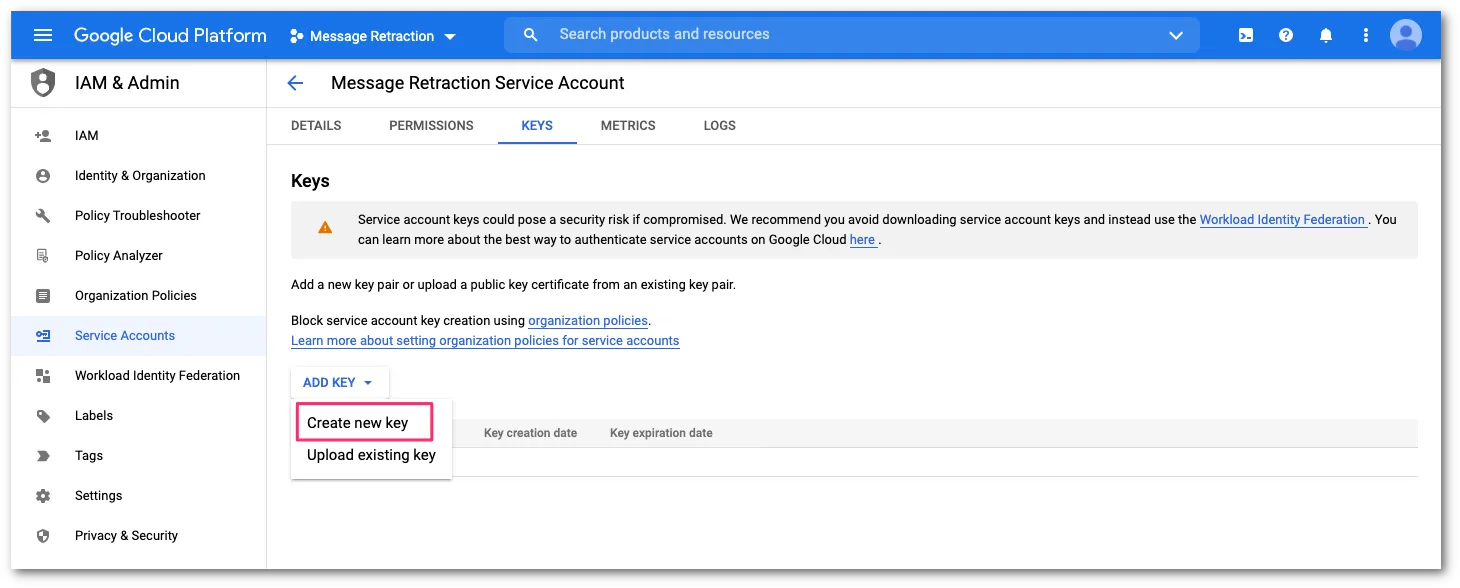
キー設定パネルで、ADD KEY > Create new keyを選択します。
-
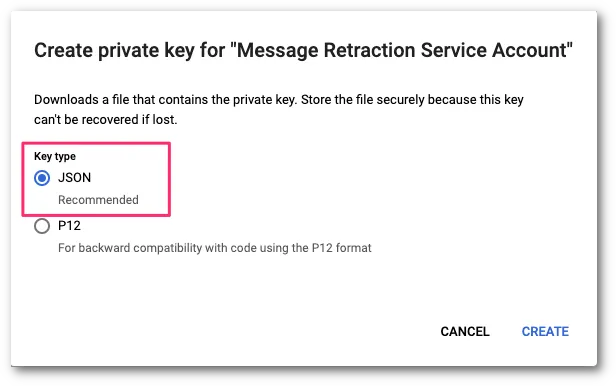
Key typeで、プライベートキーを作成するためにJSONをフォーマットとして選択します。次に、CREATEを選択します。
前のステップで生成されたプライベートキーをEmail Securityにアップロードする必要があります。これは、Gmailの受信トレイで取り消しを実行するために必要です。
-
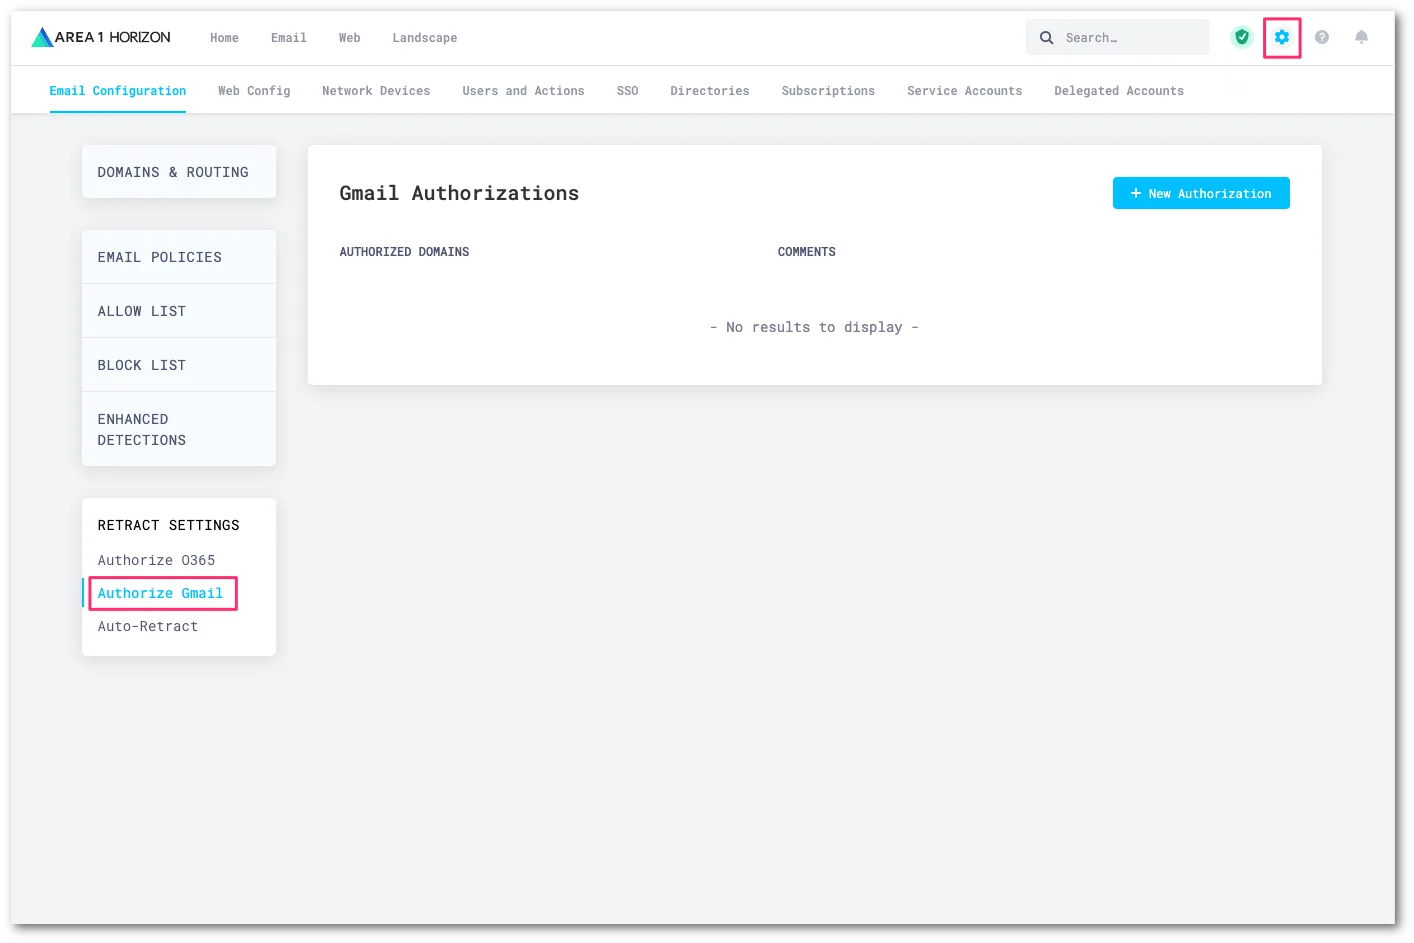
Email Securityダッシュボード ↗にログインし、Settings(歯車アイコン)を選択します。
-
Email Configuration > RETRACT SETTINGS > Authorize Gmailに移動します。
-
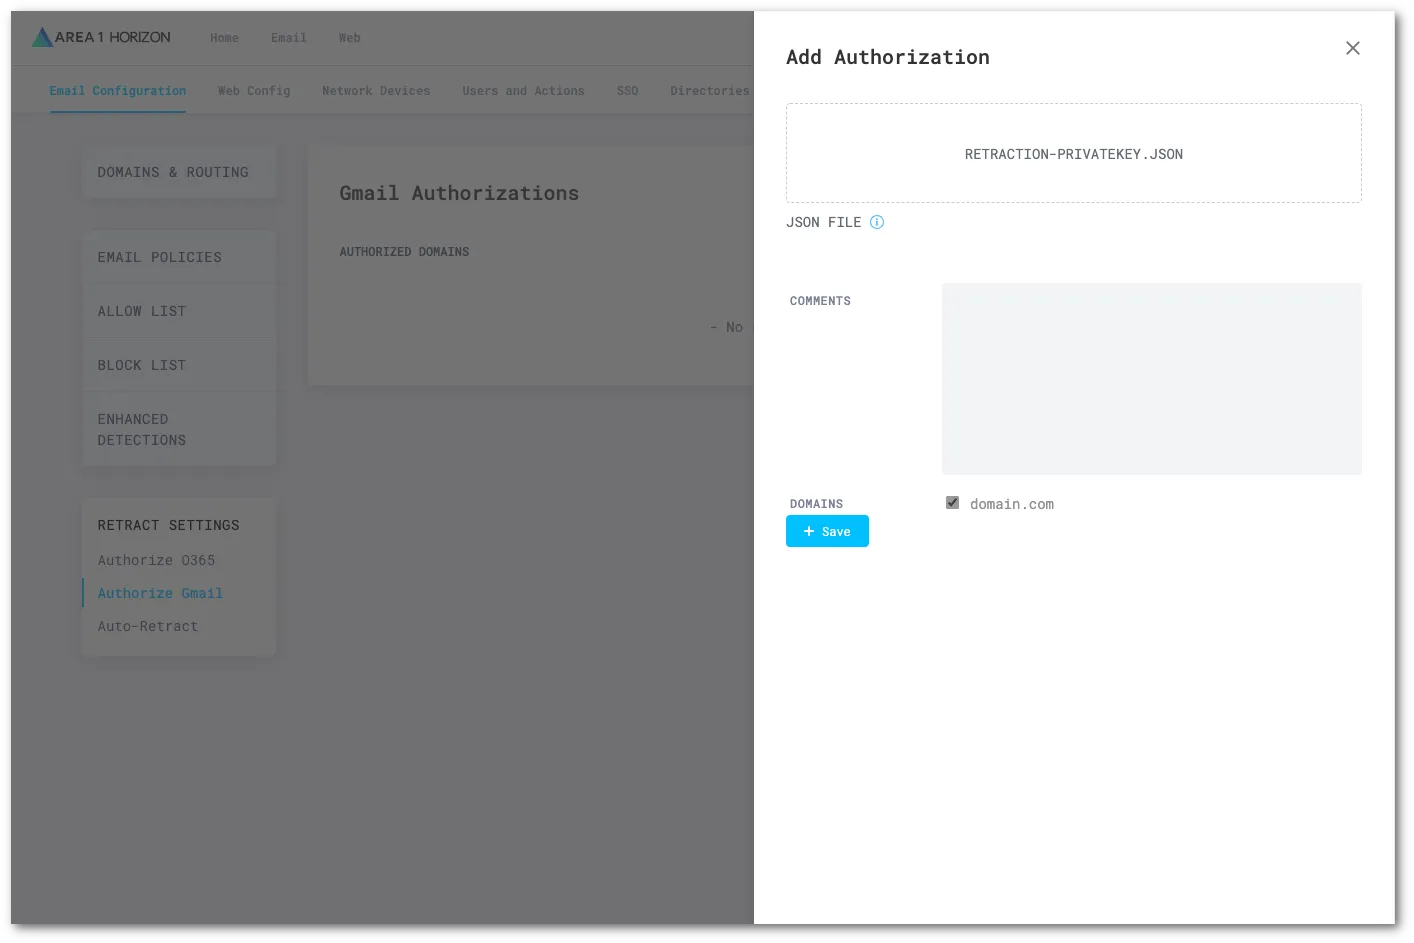
New Authorizationを選択し、以下の設定を構成します:
- **AUTHORIZATION DATA (JWT)**を選択し、JSONプライベートキーを見つけてアップロードします。
- Domainsの下で、このプライベートキーが属するドメインを指定します。
- Saveを選択して設定を保存します。
You can set up auto-retraction to automatically move messages matching certain dispositions to specific folders within a user’s mailbox.
To set up automatic retraction:
-
Log in to the Email Security (formerly Area 1) dashboard ↗.
-
Go to Settings (the gear icon).
-
On Email Configuration, go to Retract Settings > Auto-Retract.
-
Select Edit.
-
For each disposition, choose which folder the message should be sent to:
- No Action: Do not move the message.
- Junk Email: Sends the message to the junk or spam email folder.
- Trash: Sends the message to the trash or deleted items email folder.
- Soft Delete — user recoverable (Microsoft only): Sends the message to the user’s Deleted Items folder. Messages can be recovered by the user.
- Hard Delete — admin recoverable: Completely deletes messages from a user’s inbox. Google Gmailメッセージは、管理者によっても回復できません。
-
Select Update Auto-retract Settings.
Email Security (formerly Area 1) is continuously gathering new information about phishing campaigns. Users might have email messages in their inboxes that were scanned by Email Security (formerly Area 1) but not retracted initially because, at the time of scan, these email messages had not been identified as a threat. To mitigate risk, Email Security (formerly Area 1) offers you tools to re-evaluate email messages at a fixed time interval based on knowledge Cloudflare may have acquired since initial delivery. Any email messages that fit this new threat knowledge will be retracted.
You can enable two options:
- Post Delivery Response: Email Security (formerly Area 1) will continue to re-evaluate emails already delivered to your users’ inboxes at a fixed time interval in search for phishing sites or campaigns not previously known to Cloudflare. If any email messages fitting these new criteria are found, Email Security (formerly Area 1) retracts them.
- Phish Submission Response: Email Security (formerly Area 1) will retract emails already delivered that are reported by your users as phishing, and are found to be malicious by Email Security (formerly Area 1). Retraction will occur according to your configuration.
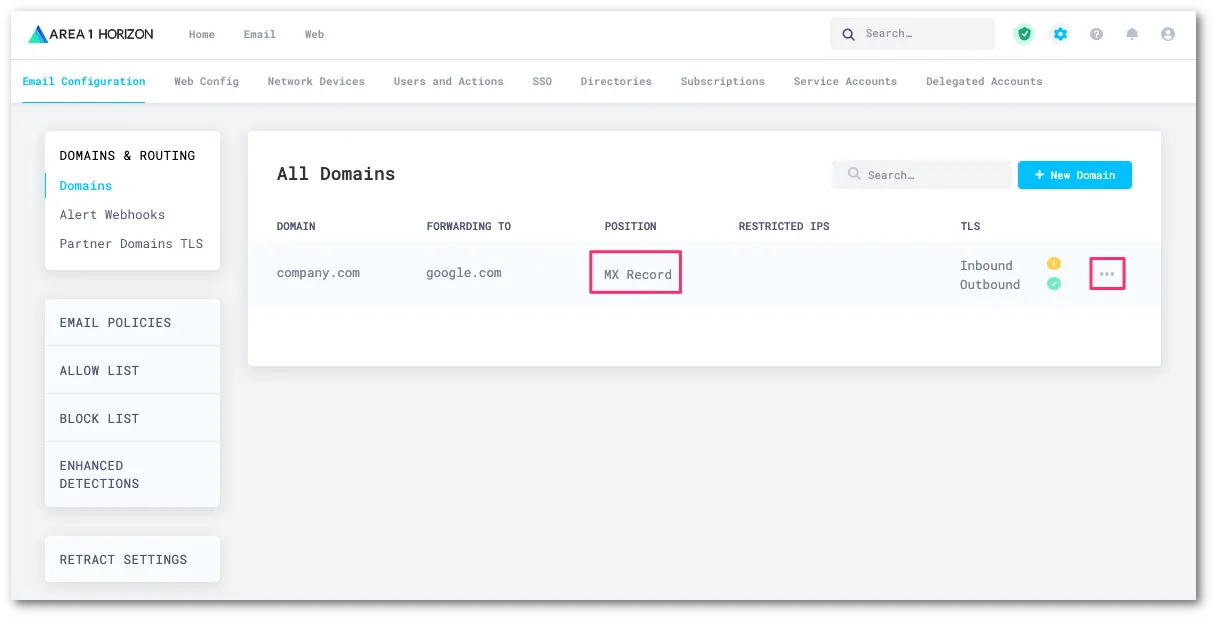
Email SecurityがあなたのドメインのMXレコードとして設定されていないため、メール処理順序におけるArea 1の位置(ホップカウント)を調整する必要があります。
-
Email Securityダッシュボード ↗にログインし、Settings(歯車アイコン)を選択します。
-
Email Configuration > DOMAINS & ROUTINGに移動します。
-
確認したいドメインの三点リーダーメニューを選択し、次にEditを選択します。
-
スタンドアロンのGmailのみのデプロイメントの場合、値は
2に設定する必要があります。そうでない場合は、Hopsカウントを2に調整し、Update Domainを選択します。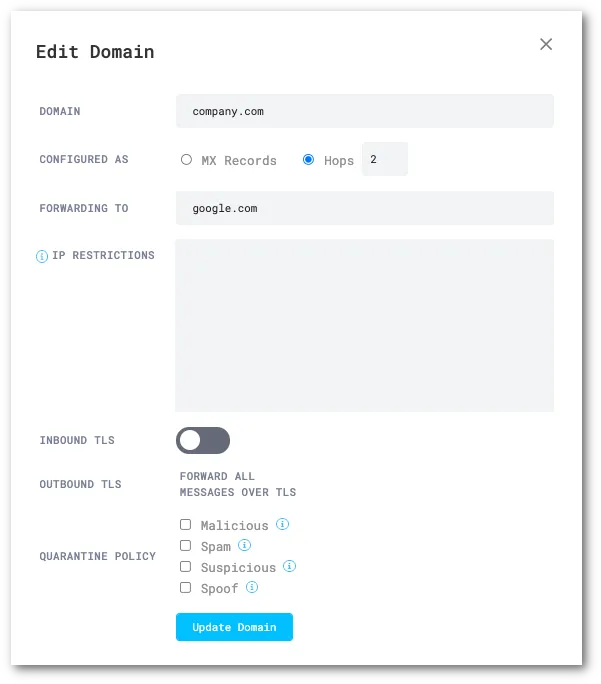
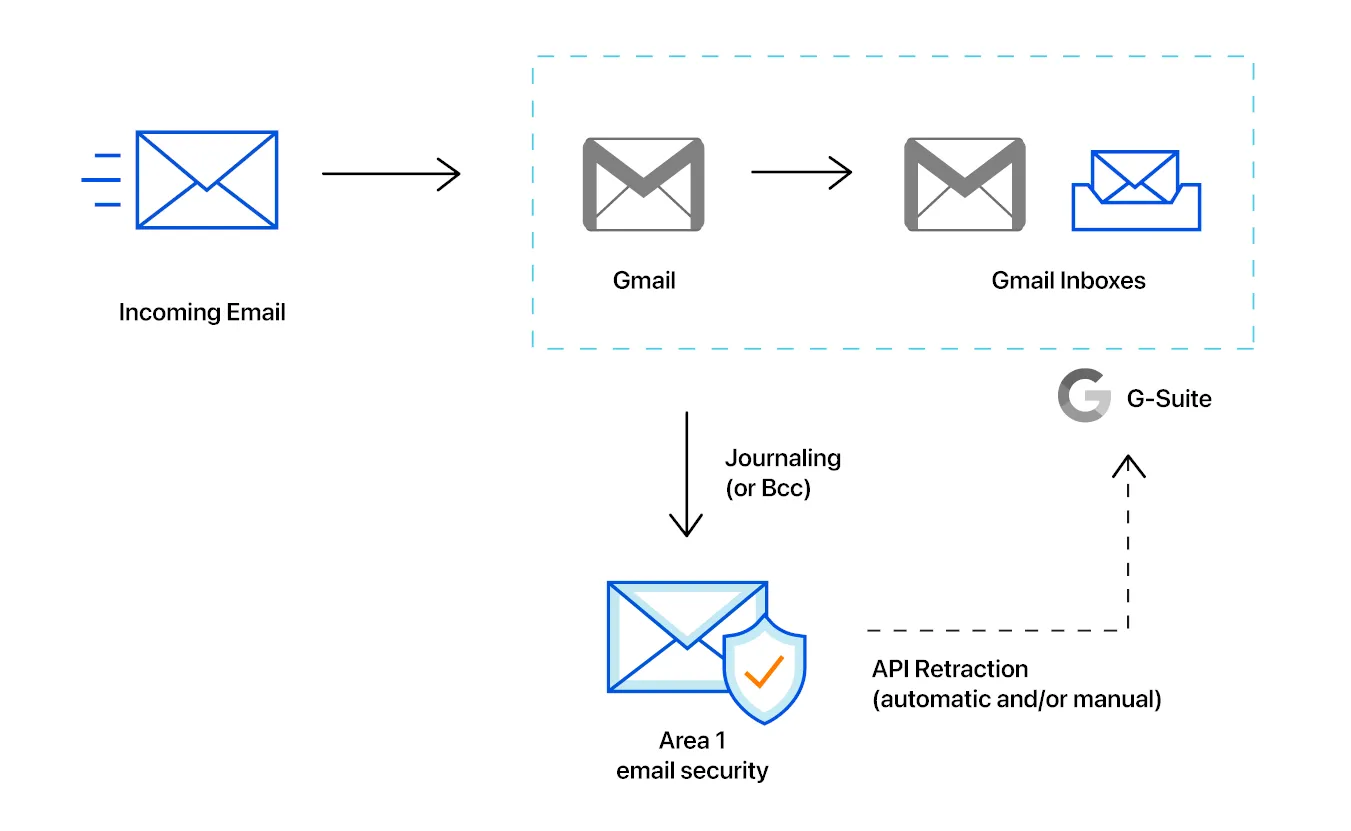
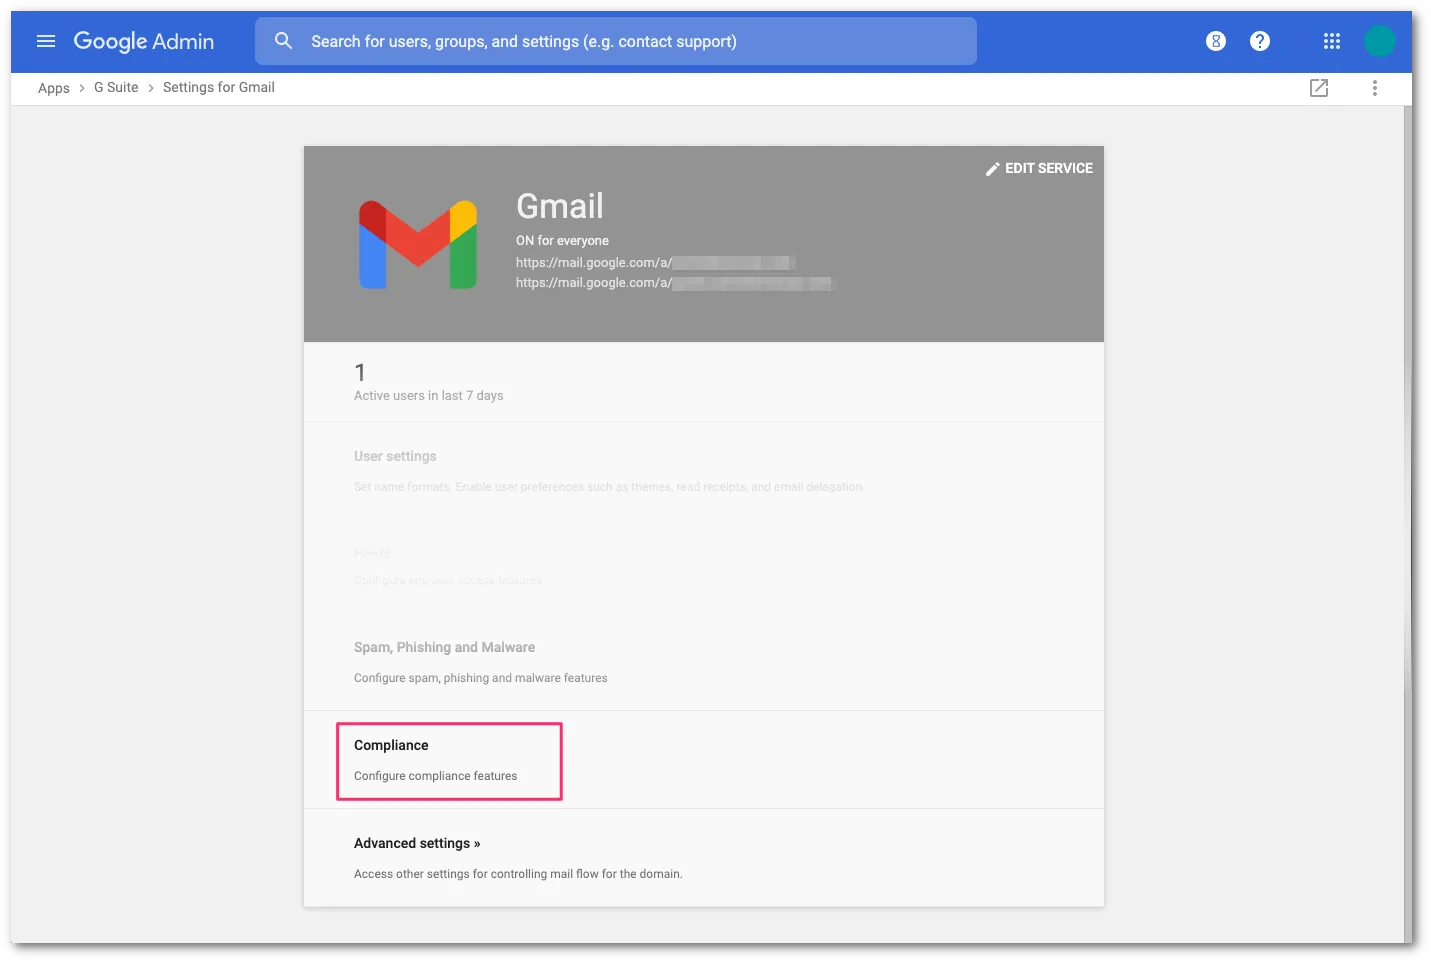
Email Securityがメッセージを自動的に取り消すためには、受信メールメッセージのコピーをEmail Securityに送信する必要があります。メッセージはBCCコンプライアンスルールを使用してEmail Securityに送信できます。これを設定する方法を学ぶために以下の手順を参照してください。Email SecurityがMXとしてデプロイされている場合、自動取り消しは利用できません。
-
In the Admin console, go to Menu > Apps > Google Workspace > Gmail > Compliance.
-
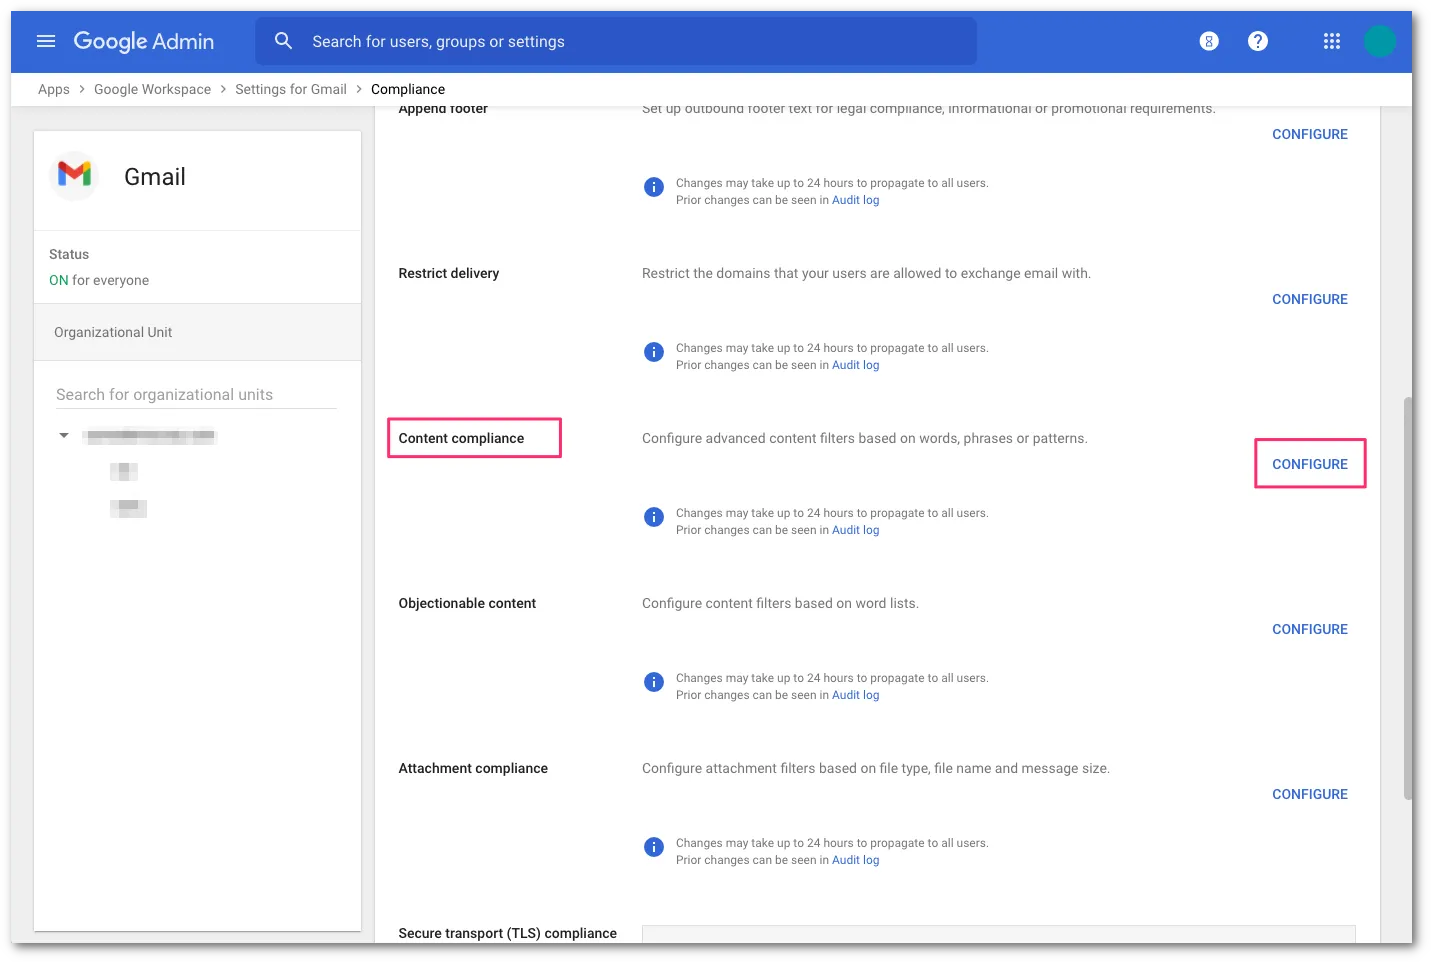
Scroll to Content Compliance and select CONFIGURE.
-
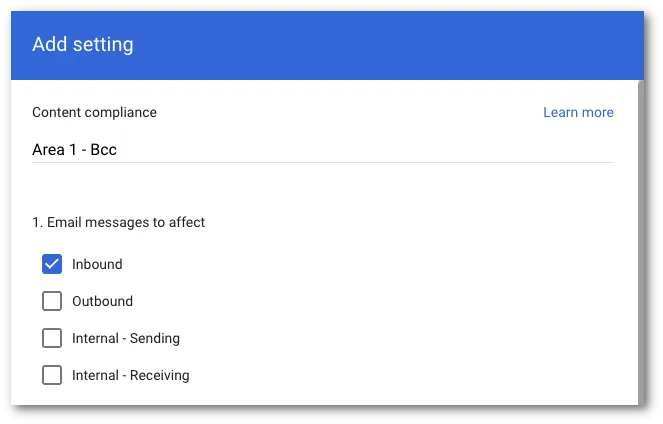
Add a Content Compliance filter and name it
Area 1 - BCC. -
In Email messages to affect, select Inbound.
-
Select the recipients that you want to send emails to Area 1 via BCC:
- Select Add to configure the expression.
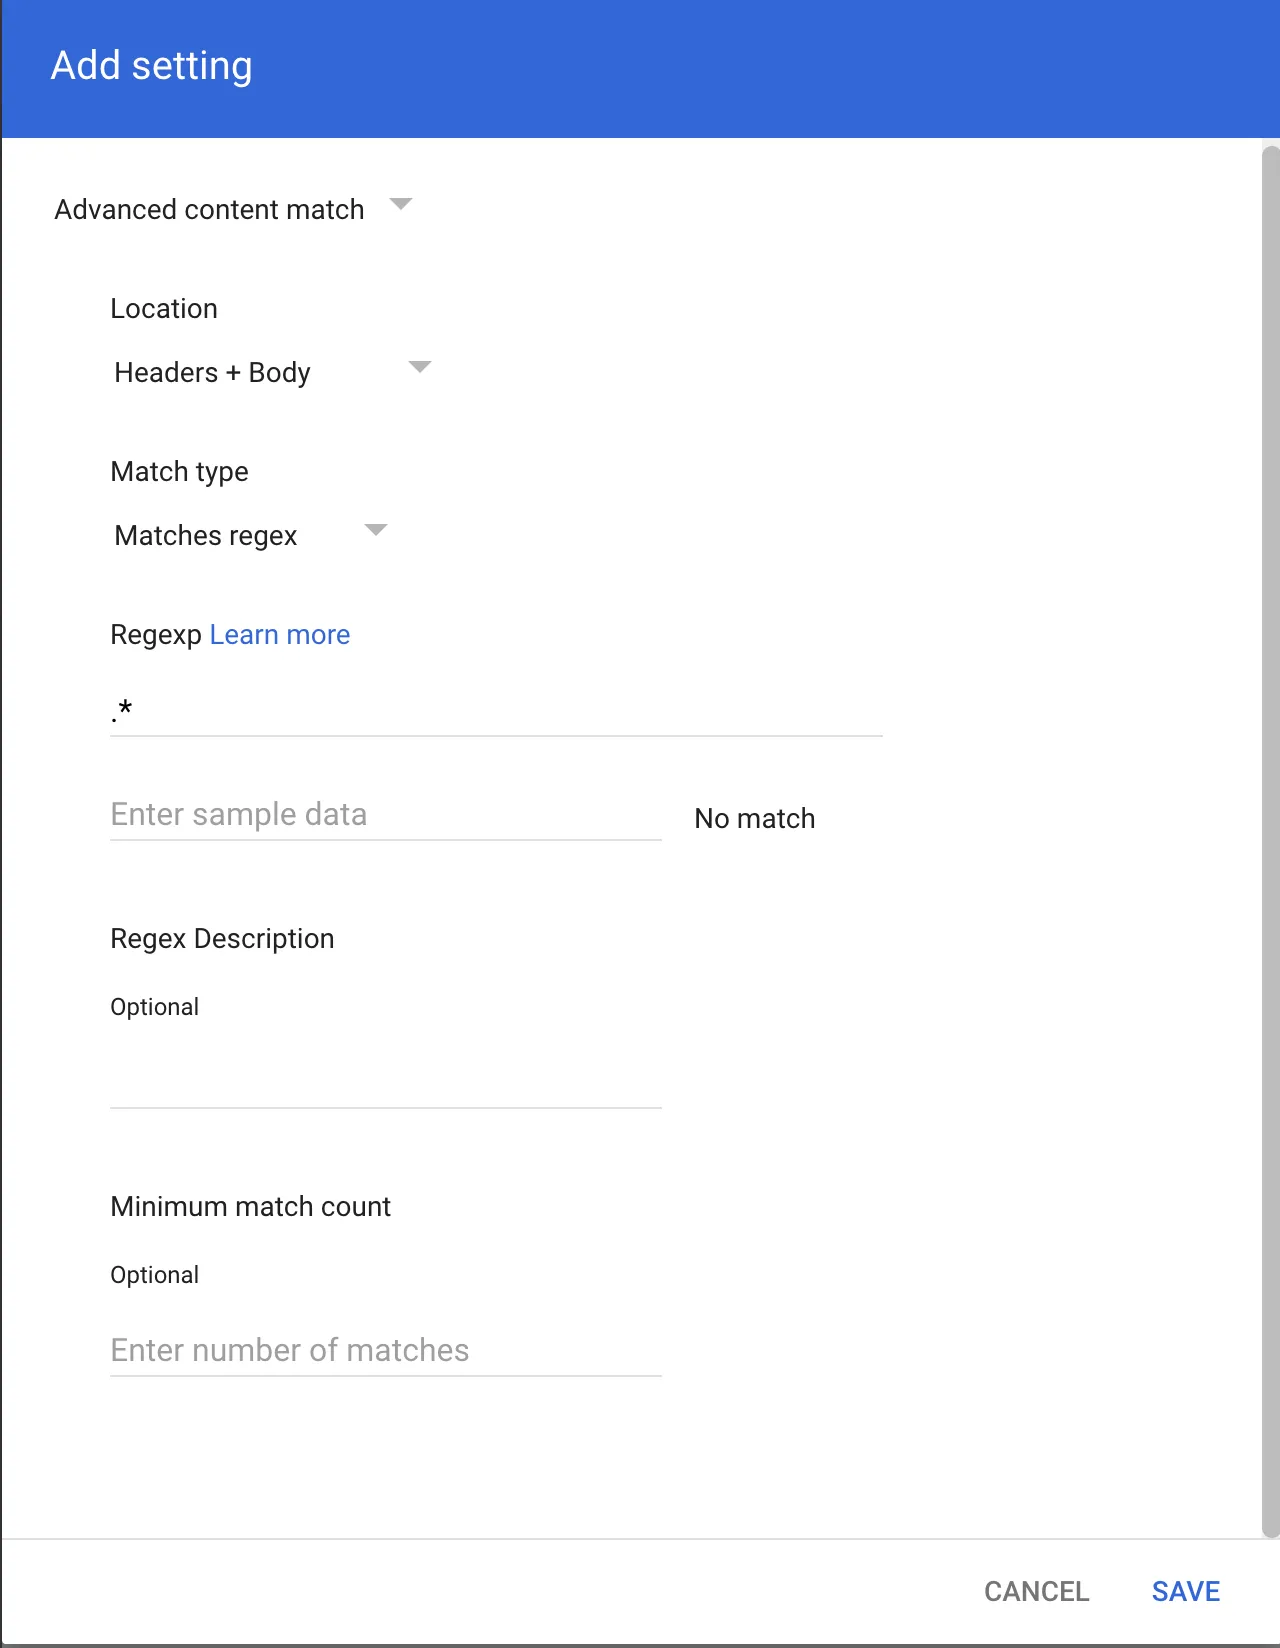
- Select Advanced content match.
- In Location, select Headers + Body from the dropdown.
- In Match type select Matches regex.
- In Regexp input
.*. You can customize the regex as needed and test within the admin page or on sites like https://regexr.com/ ↗. - Select SAVE.
-
In If the above expressions match, do the following, make the following changes:
-
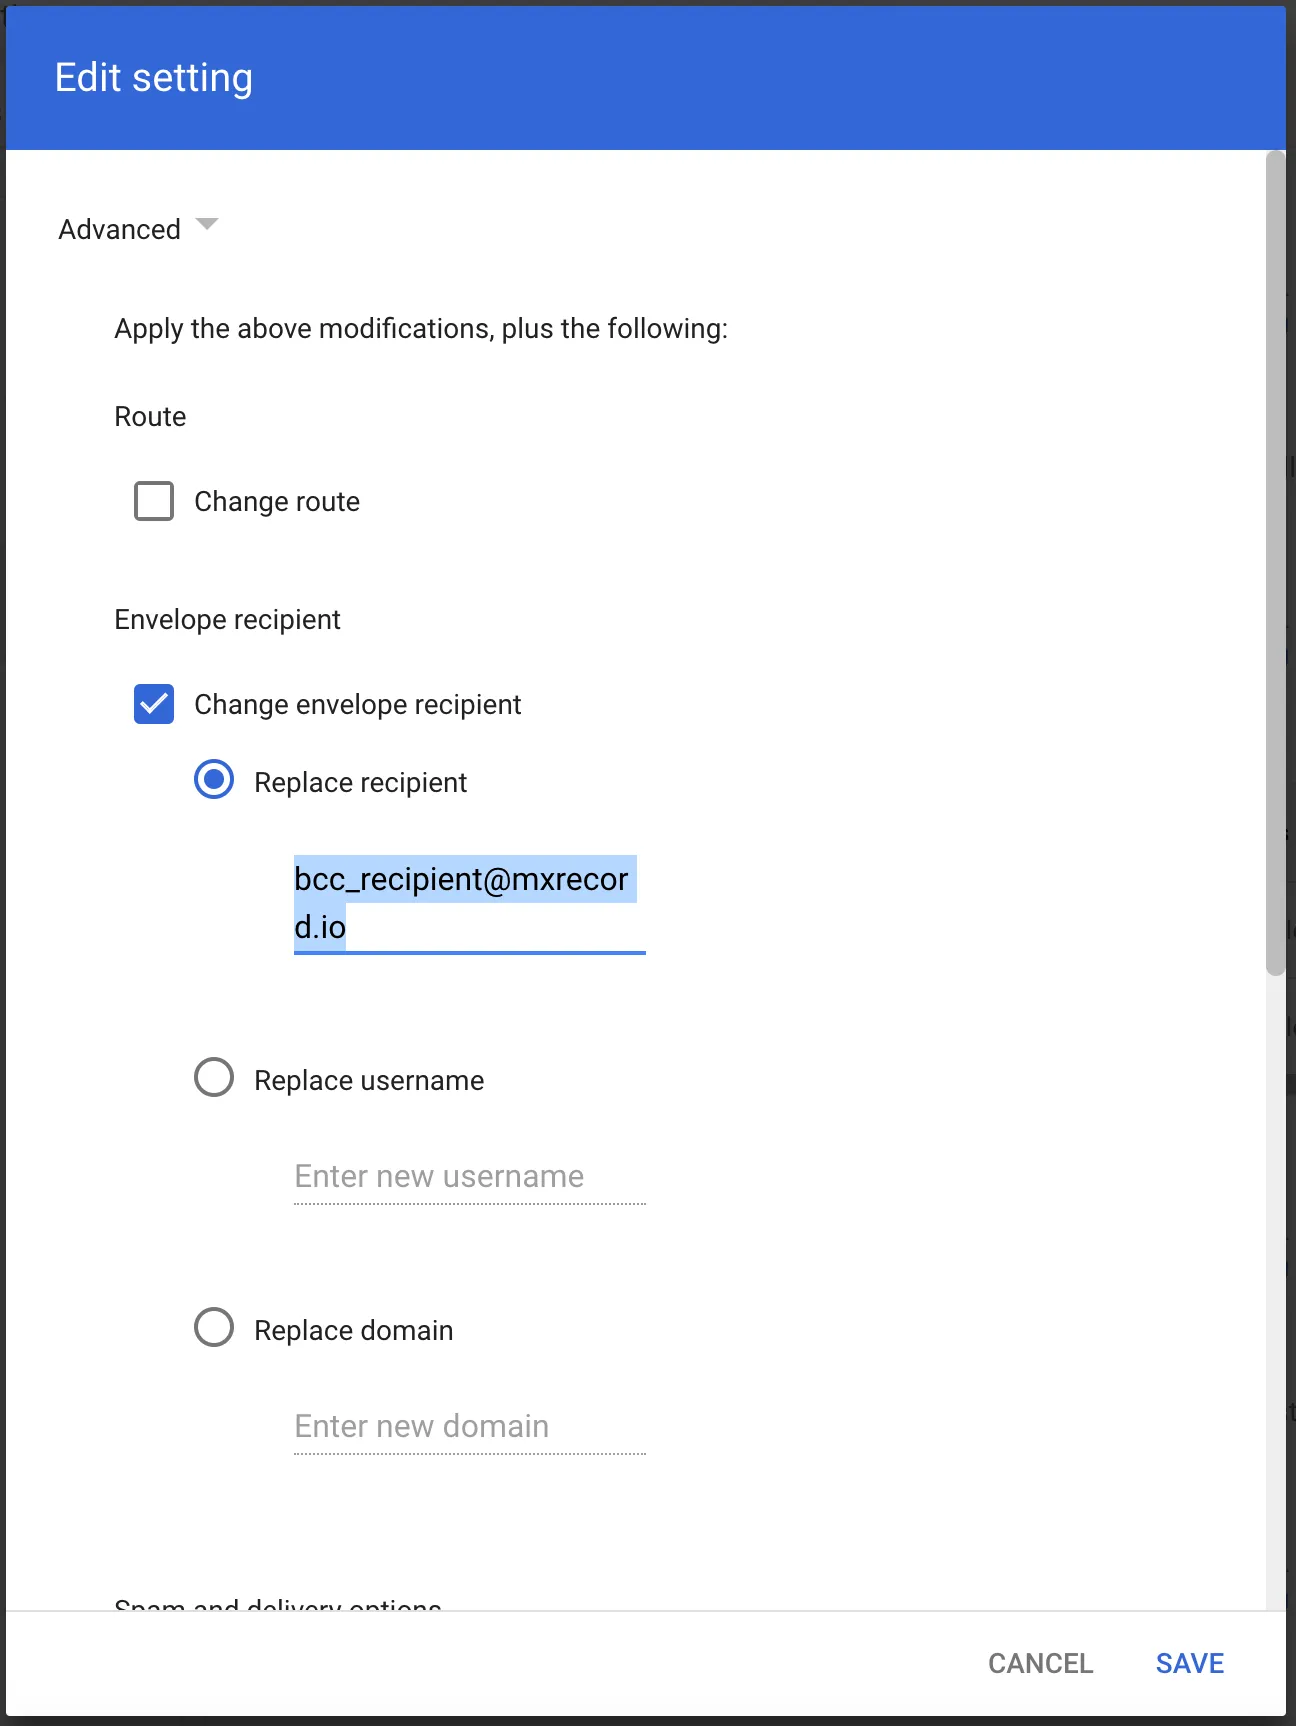
In Also deliver to select Add more recipients.
- Under Recipients select Add.
- Change the setting to Advanced.
- In Envelope recipient select Change envelope recipient.
- In Replace recipient add the recipient BCC address. For example,
<customer_name>@journaling.mxrecord.io. This address is specific to each customer tenant and can be found in your Portal ↗.
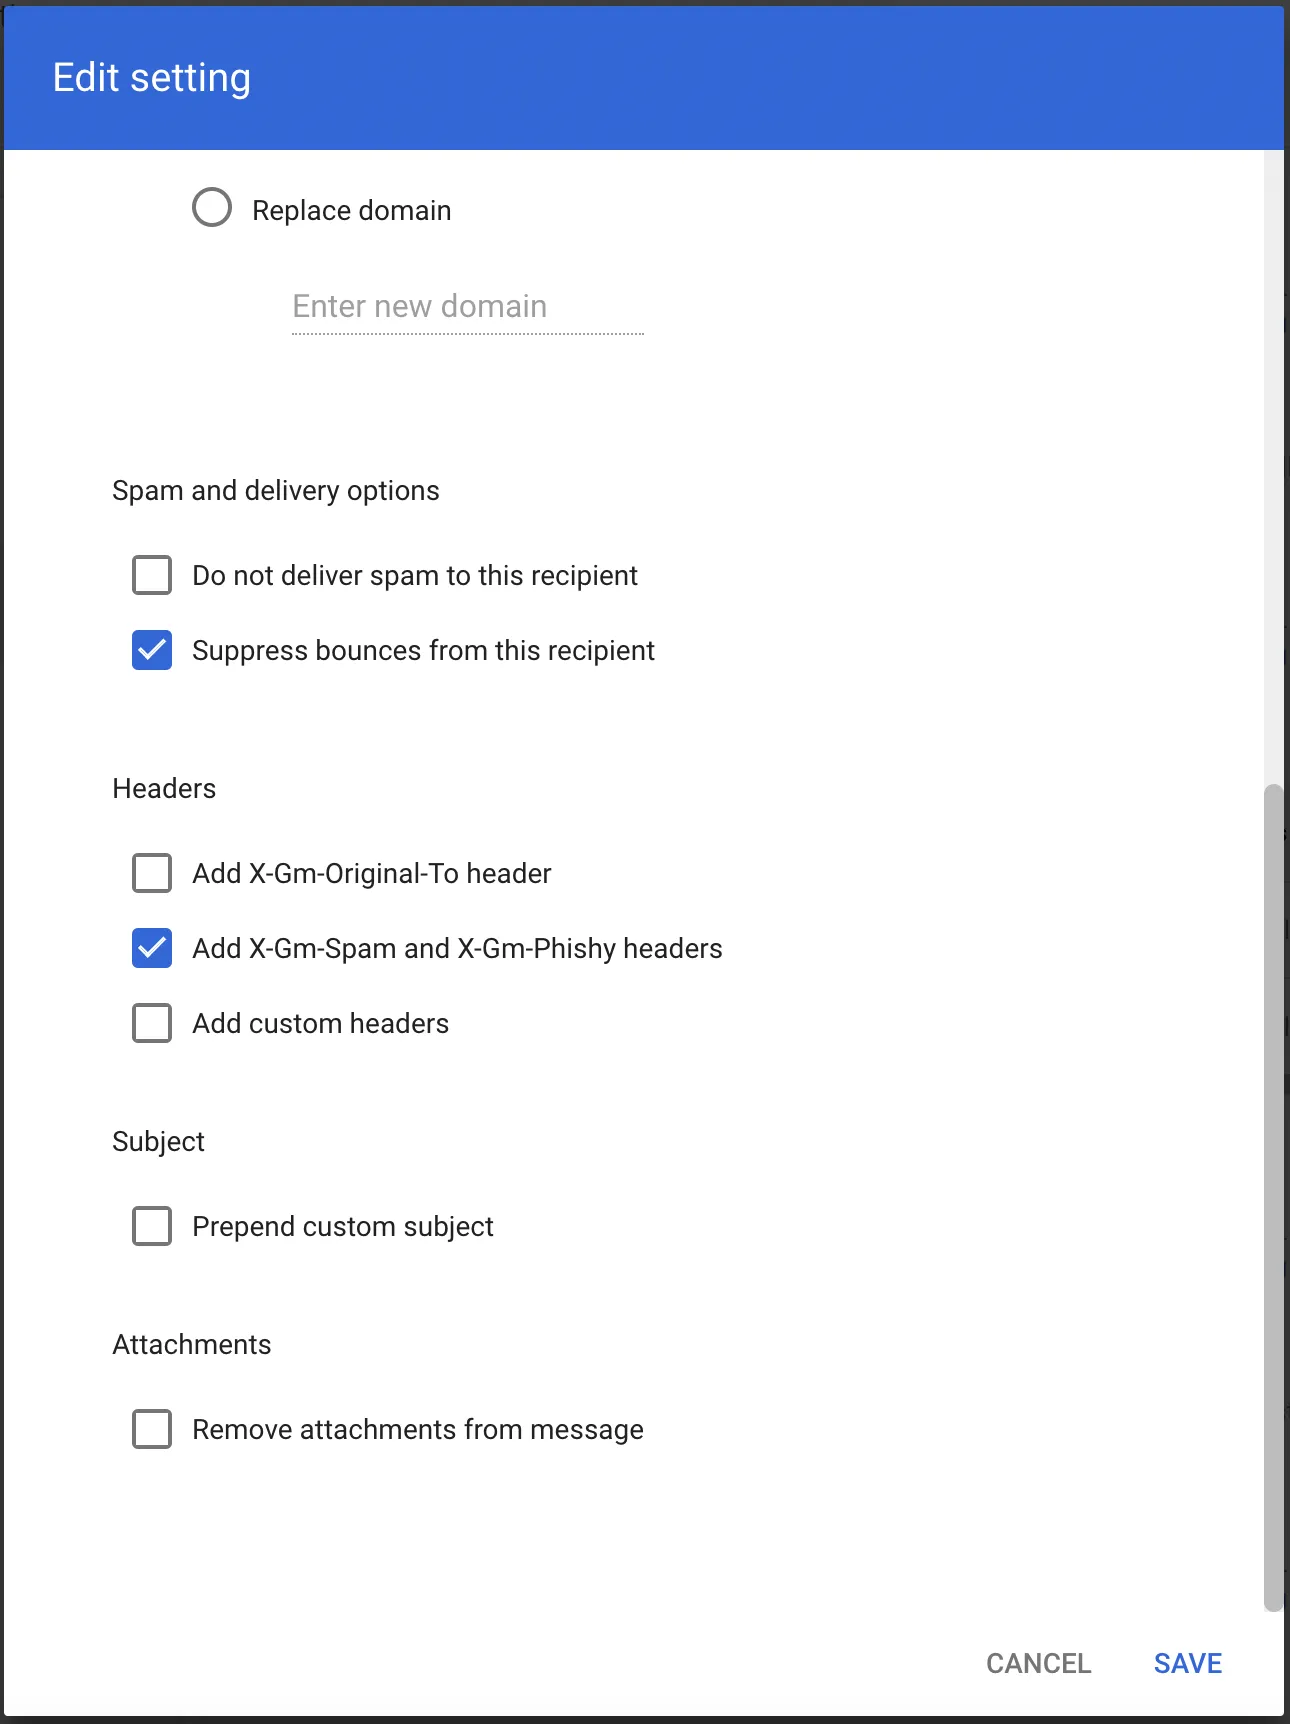
- Make sure that in Spam and delivery options > Do not deliver spam to this recipient is not checked.
- Under Headers select Add X-Gm-Spam and X-Gm-Phishy headers.
- Select SAVE.
-
-
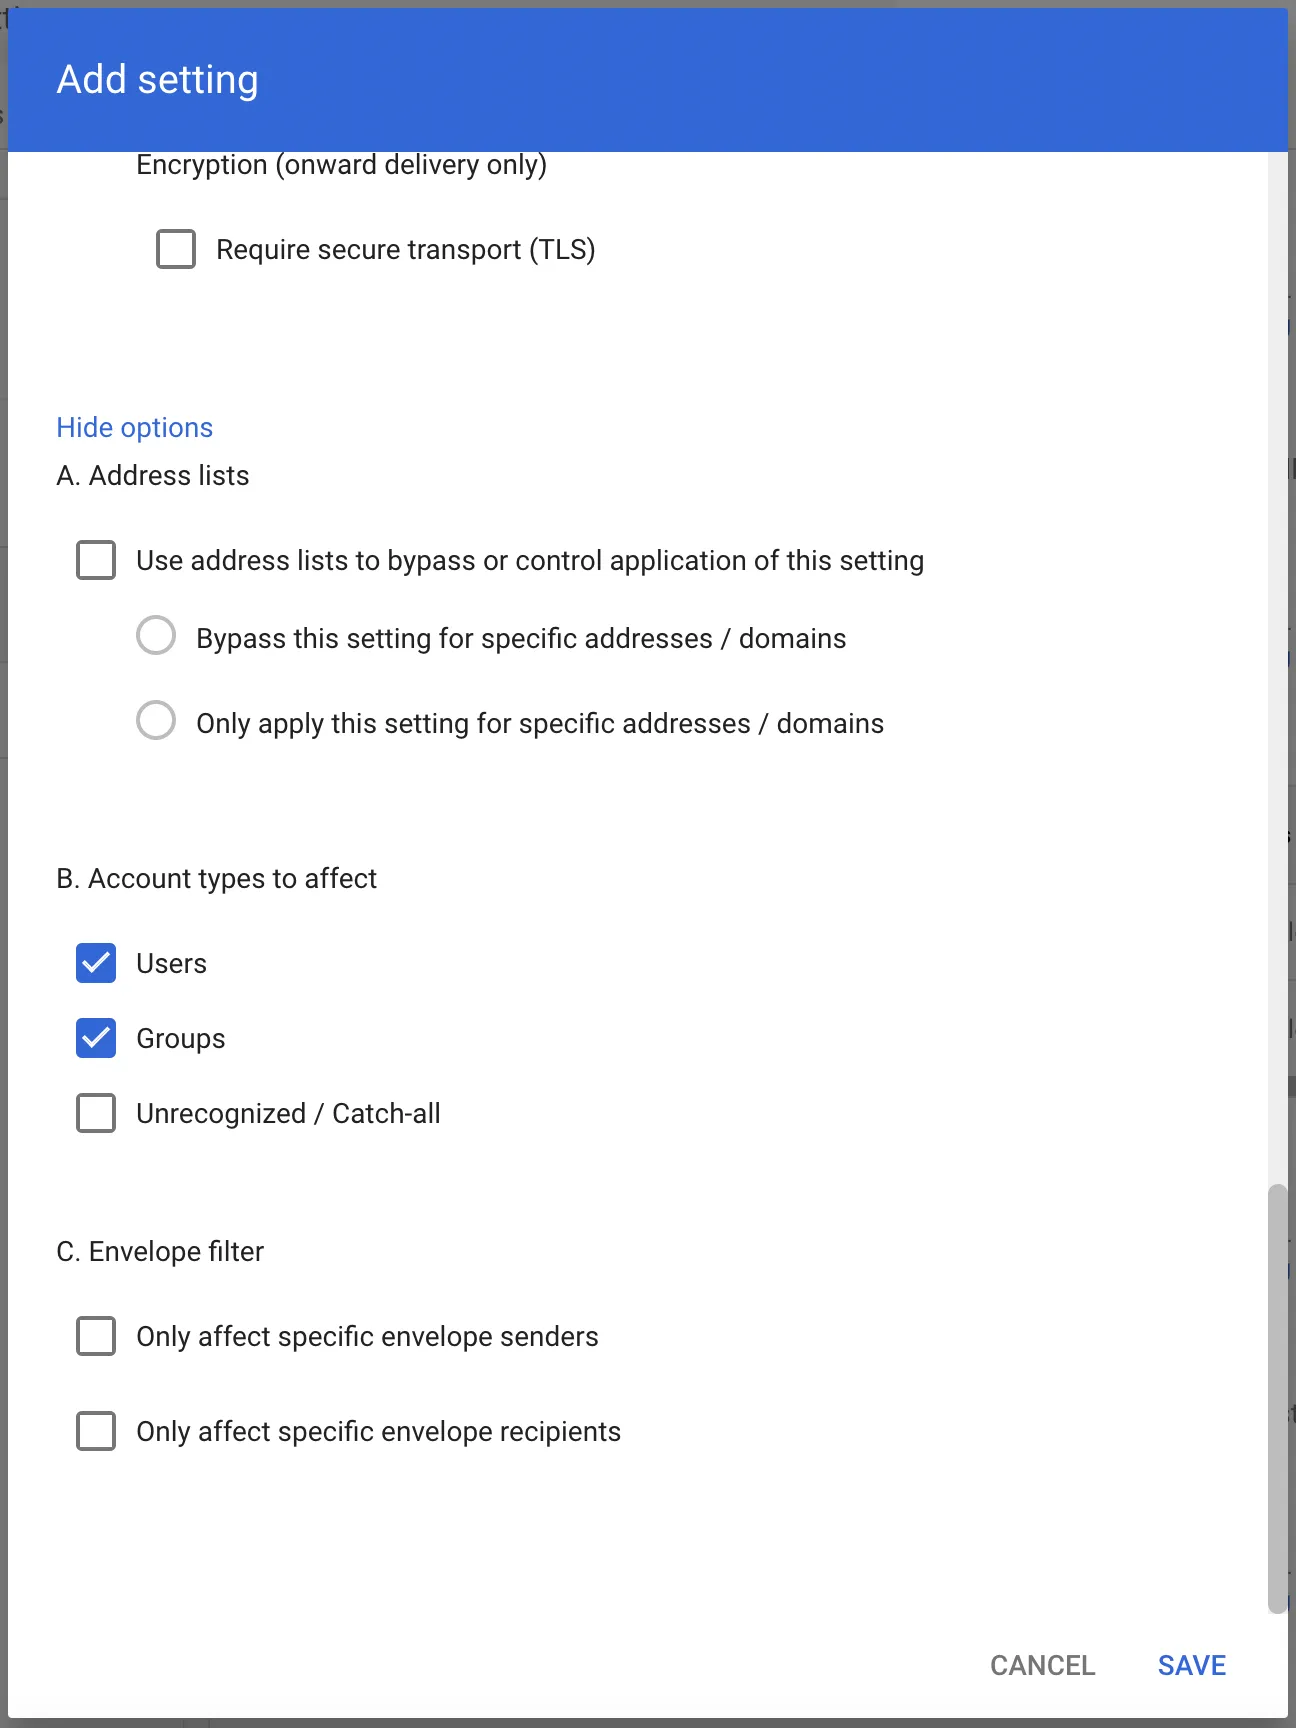
Scroll down and select Show options.
- Under Account types to affect select Groups.
- Select SAVE.
Select from the following BCC addresses to process email in the correct geographic location.
| Host | Location | Note |
|---|---|---|
<customer_name>@journaling.mxrecord.io | US | Best option to ensure all email traffic processing happens US data centers. |
<customer_name>@journaling.mailstream-eu-primary.mxrecord.io | EU | Best option to ensure all email traffic processing happens in Germany, with backup to US data centers. |
<customer_name>@journaling.mailstream-eu1.mxrecord.io | EU | Best option to ensure all email traffic processing happens within the EU without backup to US data centers. |
<customer_name>@journaling.mailstream-bom.mxrecord.mx | India | Best option to ensure all email traffic processing happens within India. |
<customer_name>@journaling.mailstream-india-primary.mxrecord.mx | India | Same as mailstream-bom.mxrecord.mx, with backup to US data centers. |
<customer_name>@journaling.mailstream-asia.mxrecord.mx | India | Best option to ensure all email traffic processing happens in India, with Australia data centers as backup. |
<customer_name>@journaling.mailstream-syd.area1.cloudflare.net | Australia / New Zealand | Best option to ensure all email traffic processing happens within Australia. |
<customer_name>@journaling.mailstream-australia.area1.cloudflare.net | Australia / New Zealand | Best option to ensure all email traffic processing happens in Australia, with India and US data centers as backup. |
When retraction is enabled, you can manually retract messages that were not automatically retracted.
-
Log in to the Email Security (formerly Area 1) dashboard ↗.
-
Select the search bar and enter the search parameters to find the emails you are looking for.
-
To retract a single message, select Retract. To retract multiple messages, first select the checkboxes on the messages you want to retract. Then, select Retract.
-
Choose where you want to retract the message to, and select Retract message.

-
If the retraction was successful, there will be positive confirmation on Email Security (formerly Area 1) dashboard.