ハードウェアコネクタの設定
Magic WAN ↗を購入する必要があります。その後、Magic WANコネクタを購入して使用できます。Magic WANコネクタは、ネットワークの主要なエッジデバイスとして機能するか、既存のネットワーク機器とインラインで展開できます。
Cloudflareダッシュボードで設定を構成する前に、Magic WANコネクタを購入する必要があります。Magic WANコネクタを購入すると、デバイスはCloudflareアカウントに登録され、Cloudflareダッシュボードに表示されます。
Magic WANコネクタデバイスの購入オプションについては、アカウント担当者にお問い合わせください。
各サイトに対して、冗長性のために最大2つのMagic WANコネクタをインストールできます。1つのコネクタが故障した場合、トラフィックは他のコネクタにフェイルオーバーし、そのサイトへの接続が失われることはありません。
このタイプの高可用性(HA)構成では、ピアコネクタの健康状態を監視するために、信頼性の高いLANインターフェースをHAリンクとして選択します。HAリンクは専用リンクでも、他のLANトラフィックと共有することもできます。
施設の高可用性構成が必要な場合は、高可用性構成についてを参照してください。
高可用性構成が必要ない場合は、Cloudflareダッシュボード設定の構成に進んでください。
Magic WANコネクタのハードウェアバージョンには、10Gスループットをサポートする2つのSFP+ポート ↗と、1Gスループットをサポートする6つのRJ45ポートが含まれています。
このトピックの詳細については、SFP+ポート情報を参照してください。
Sites represent the local network where you have installed your Magic WAN Connector — for example, a branch office location.
You need to create a site and set up all the settings associated with it before you can connect your Magic WAN Connector to the Internet.
To add a site:
- Log in to the Cloudflare dashboard ↗ and select your account.
- Go to Magic WAN > Sites.
- Select Create to create a new site and start the configuration wizard.
- Add a name and description for your new site.
- (Optional) In Site location, you can add the geographical coordinates for your site. If you add geographical coordinates, your site will show up in the Site Analytics overview map.
- Under Connector, select Add Connector. This will show you a list of Magic WAN Connector devices associated with your account. ここに表示されるには、すでにコネクタを購入している必要があります。コネクタがこのリストに表示されない場合は、前提条件を参照してください。
- If you have more than one Connector, choose the one that corresponds to the site you are creating. Connectors are identified by a serial number, also known as a service tag. Use this information to choose the right Connector. Select Add Connector when you are ready to proceed.
- The Connector will be added to your site with an Interrupt window defined. The interrupt window is the time period when the Magic WAN Connector software can update, which may result in interruption to existing connections. You can change this later. Refer to Interrupt window for more details on how to define when the Connector can update its systems.
- Select Next to proceed to creating your WAN and LAN networks.
Create a POST request using the API to create a site.
Example:
curl https://api.cloudflare.com/client/v4/accounts/{account_id}/magic/sites \--header "X-Auth-Email: <EMAIL>" \--header "X-Auth-Key: <API_KEY>" \--header "Content-Type: application/json" \--data '{ "site": { "description": "<SITE_DESCRIPTION>", "name": "<SITE_NAME>" }}'If you created your site successfully, you should receive a message similar to the following:
{ "result": { "site": { "id": "<SITE_ID>", "name": "<SITE_NAME>", "description": "<SITE_DESCRIPTION>", "connector_id": null, "secondary_connector_id": null, "ha_mode": false } }, "success": true, "errors": [], "messages": []}Take note of the site id parameter, as you will need it to create WANs and LANs.
- In WAN configuration, select Create. You can create one or more wide area networks (WANs) ↗. Configuring multiple WANs will create multiple IPsec tunnels. This allows the Connector to failover between circuits according to their health.
- In Interface name, enter a descriptive name for your WAN.
- Interface number 使用しているWAN用の物理Magic WANコネクタEthernetポートを指します。ポートは
GE1、GE2、GE3、GE4、GE5、GE6とラベル付けされています。コネクタで使用しているポートに対応する番号を選択してください。
1 Gbpsを超えるスループットが必要な場合は、SFP+ポートの1つを使用できます。ハードウェアのサポートに関する詳細は、SFP+ポート情報を参照してください。 - In VLAN ID, enter a number between
0and4094to specify a VLAN ID. - In Priority, choose the priority for your WAN. Lower numbers have higher priority. Refer to Traffic steering to learn more about how Cloudflare calculates priorities.
- Addressing: Specify whether the WAN IP is fetched from a DHCP server or if it is a static IP. If you choose a static IP, you also need to specify the static IP and gateway addresses.
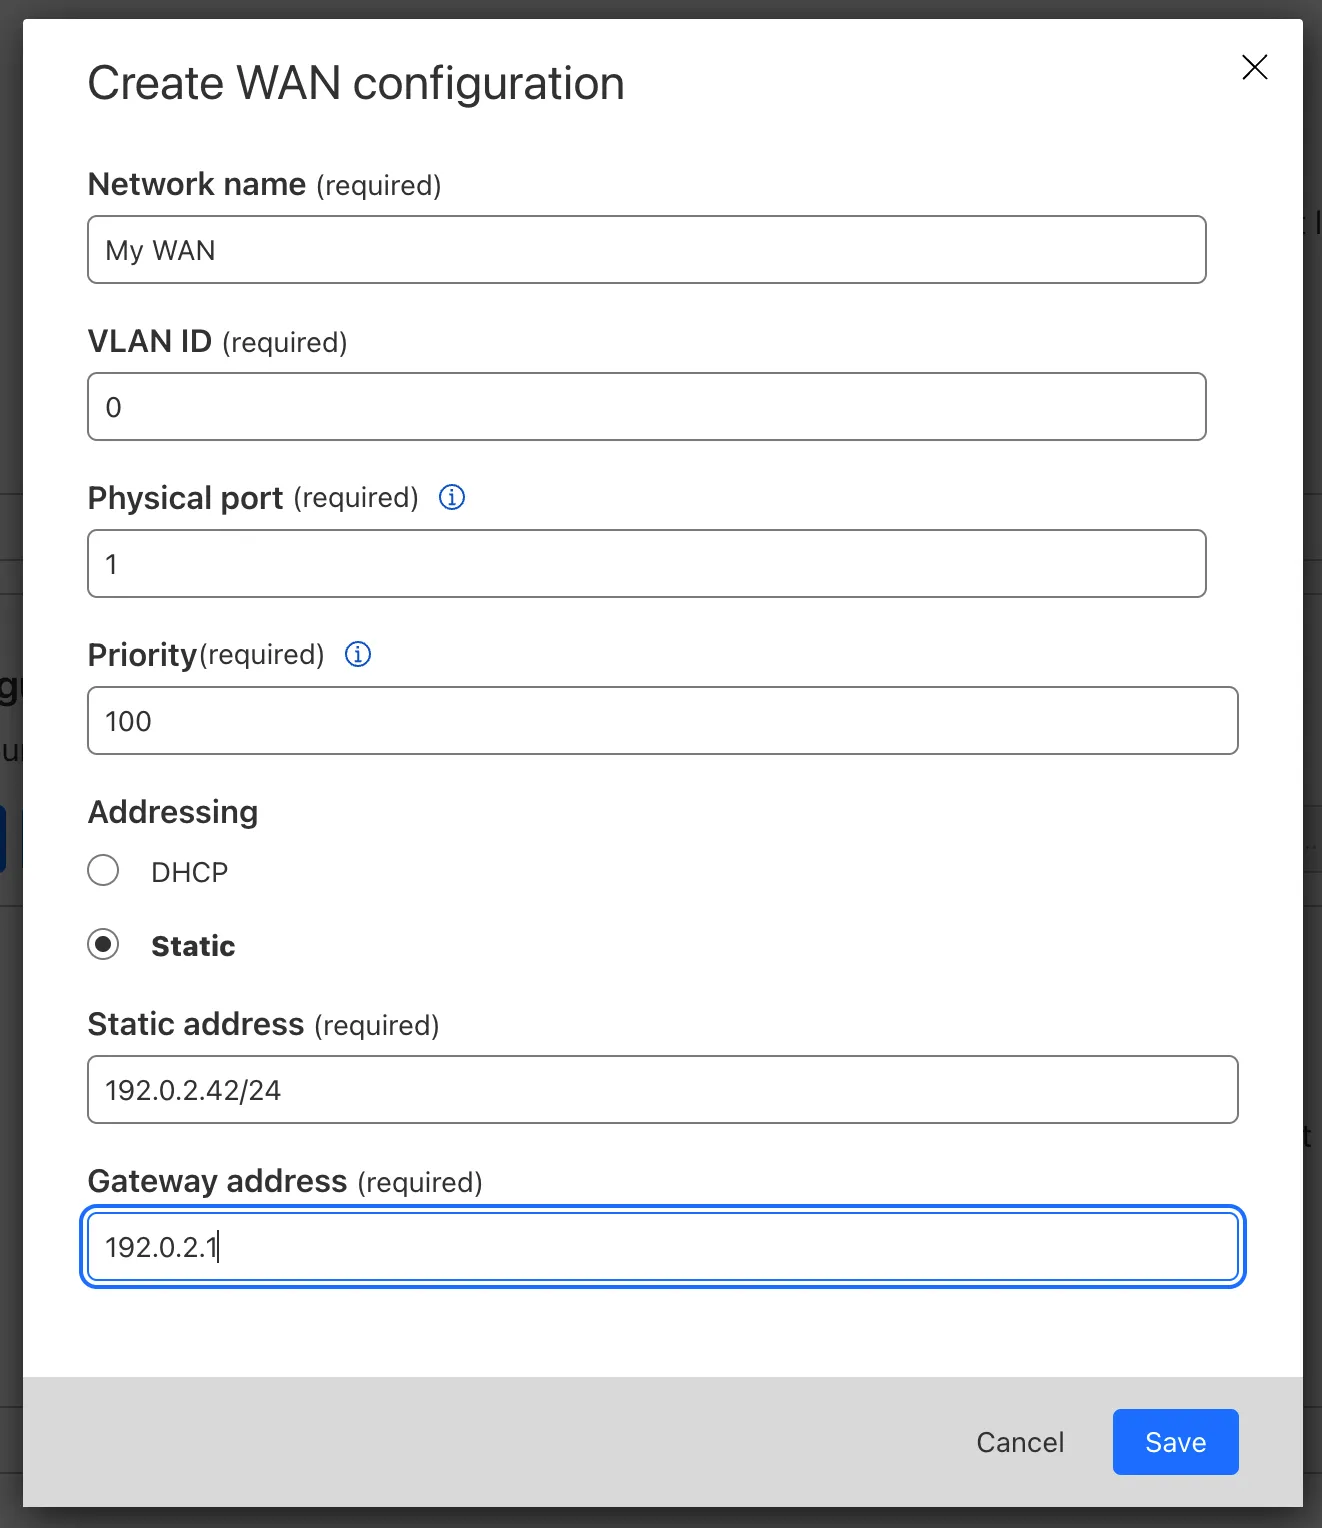
- Select Save when you are finished.
Create a POST request using the API to create a WAN.
The static_addressing object is optional. Omit it if you are using DHCP. If you are using static addressing, add the secondary_address parameter when your site is in high availability (HA) mode.
Example:
curl https://api.cloudflare.com/client/v4/accounts/{account_id}/magic/sites/{site_id}/wans \--header "X-Auth-Email: <EMAIL>" \--header "X-Auth-Key: <API_KEY>" \--header "Content-Type: application/json" \--data '{ "wan": { "description": "<YOUR_WAN_NAME>", "physport": 1, "priority": 0, "vlan_tag": 0 }}'-
In LAN configuration, select Create.
-
Enter a descriptive name for your LAN in Interface name.
-
Interface number 使用しているLAN用の物理Magic WANコネクタEthernetポートを指します。ポートは
GE1、GE2、GE3、GE4、GE5、GE6とラベル付けされています。コネクタで使用しているポートに対応する番号を選択してください。
1 Gbpsを超えるスループットが必要な場合は、SFP+ポートの1つを使用できます。ハードウェアのサポートに関する詳細は、SFP+ポート情報を参照してください。 -
In VLAN ID, specify a VLAN ID to create virtual LANs.
-
In Static addressing > Static address give your Connector’s LAN interface its IP address. You can also enable the following options if they suit your use case:
- This is a DHCP server: If your Connector is a DHCP server.
- This is a DHCP relay: If your Connector is a DHCP relay.
-
(Optional) In Directly attached subnet > Static NAT prefix, enter a CIDR prefix to enable NAT (network address translation). The prefix you enter here should be the same size as the prefix entered in Static addressing. For example, both networks have a subnet mask of
/24:192.168.100.0/24and10.10.100.0/24. -
(Optional) If your LAN contains additional subnets behind a layer 3 router, select Add routed subnet under Routed subnets to add them:
-
Prefix: The CIDR prefix for the subnet behind the L3 router.
-
Next hop: The address of the L3 router to which the Connector should forward packets for this subnet.
-
Static NAT prefix: Optional setting. If you want to enable NAT for a routed subnet, supply an “external” prefix for the overlay-facing side of the NAT to use. It must be the same size as Prefix.
Refer to Routed subnets for more information.
-
-
Select Save.
-
Select Save and exit to finish your configuration. Tunnels and static routes will be automatically created and associated with your site once the Magic WAN Connector boots up (refer to the next step).
Create a POST request using the API to create a LAN.
Example:
curl https://api.cloudflare.com/client/v4/accounts/{account_id}/magic/sites/{site_id}/lans \--header "X-Auth-Email: <EMAIL>" \--header "X-Auth-Key: <API_KEY>" \--header "Content-Type: application/json" \--data '{ "lan": { "description": "<YOUR_LAN_NAME>", "physport": 2, "static_addressing": { "address": "172.16.14.0/24" }, "vlan_tag": 0 }}'After setting up your LANs, you can configure your Connector to enable communication between them without traffic leaving your premises. Refer to Network segmentation for more information.
Magic WAN Connector supports different types of DHCP configurations. Connector can:
- Connect to a DHCP server or use a static IP address instead of connecting to a DHCP server.
- Act as a DHCP server.
- Use DHCP relay to connect to a DHCP server outside the location your Magic WAN Connector is in.
- Reserve IP addresses for specific devices on your network.
Refer to DHCP options to learn more.
Magic WANコネクタには、いくつかの展開オプションがあります。コネクタは、ローカルネットワークのDHCPサーバーとして機能するか、ローカルセットアップと統合して静的IPアドレスを割り当てることができます。
コネクタがサイトのWANルーターとして機能する場合、展開は次のようになります:
flowchart LR
accTitle: DHCPサーバーとして設定されたMagic WANコネクタとインターネットへの接続。
    a(Magic WANコネクタ)--> b(インターネット) --> c(Cloudflare)

    subgraph 顧客サイト
    d[LAN 1] --> a
    e[LAN 2] --> a
    end

    classDef orange fill:#f48120,color: black
    class a,c orange
以下の例では、コネクタはサイトのWANルーターの背後にあり、既存のLANの一部のみをCloudflareに接続します。
flowchart LR
accTitle: サイトのルーターに接続されたMagic WANコネクタ、そして一部のLANのみがコネクタに接続される。
    a(Magic WANコネクタ)--> b((サイトのルーター)) --> c(インターネット) --> i(Cloudflare)

    subgraph 顧客サイト
    d[LAN 1] --> a
    e[LAN 2] --> a
    g(LAN 3) --> b
    h(LAN 4) --> b
    end

    classDef orange fill:#f48120,color: black
    class a,i orange
Magic WANコネクタの上流にファイアウォールが展開されている場合、次のトラフィックを許可するようにファイアウォールを構成してください:
| プロトコル/ポート | 宛先IP/URL | 目的 |
|---|---|---|
UDP/53 | DNS宛先IP 1.1.1.1 | Cloudflare DNSサーバーへのDNSトラフィックを許可するために必要です。Cloudflareはこのポートを制御プレーンAPIのDNSルックアップに使用します。 |
TCP/443 | - | コネクタは制御プレーン操作のためにこのポートでアウトバウンドHTTPS接続を開きます。 |
UDP/4500 | 宛先IP 162.159.64.1 | コネクタの初期化および発見トラフィックのために必要です。 |
UDP/4500 | 宛先IP - CloudflareのAnycast IP | トンネルのアウトバウンド接続のために、アカウントに割り当てられたCloudflareのAnycast IPsに必要です。このトラフィックはトンネルトラフィックです。 |
TCP/7844, UDP/7844 | アウトバウンド接続 | コネクタのデバッグ機能のためです。 |
UDP/123 | http://time.cloudflare.com/ | Magic WANコネクタがCloudflareのタイムサービスに定期的に連絡するために必要です。 |
Magic WANコネクタは非アクティブの状態で出荷されます, and will only establish a connection to the Cloudflare network when it is activated. Cloudflare recommends leaving it deactivated until you finish setting it up in the dashboard.
When the Connector is first activated, one of the ports must be connected to the Internet through a device that supports DHCP. This is required so that the Connector can reach the Cloudflare global network and download the required configurations that you set up in the site configuration step.
When you are ready to connect your Magic WAN Connector to the Cloudflare network:
- Log in to the Cloudflare dashboard ↗ and select your account.
- Go to Magic WAN > Configuration > Connectors.
- Find the Connector you want to activate, select the three dots next to it > Edit. Make sure you verify the serial number to choose the right connector you want to activate.
- In the new window, the Status dropdown will show as Deactivated. Select it to change the status to Activated.
- The Interrupt window is the time period when the Magic WAN Connector software can update, which may result in interruption to existing connections. Choose a time period to minimize disruption to your sites. Refer to Interrupt window for more details on how to define when the Connector can update its systems.
- Select Update.
コネクタを有効化した後、WANインターフェースを静的IPアドレスに設定したネットワーク構成で使用できます。つまり、DHCPによって自動的に設定されないインターネット構成です。
静的IPでネットワーク構成にコネクタを使用するには:
- コネクタを有効化した後、60秒待ちます。
- DHCPを提供するインターネット接続デバイスへの物理接続を抜きます。
- サイト構成ステップで指定された構成に一致するように物理接続を調整します(例えば、DHCP接続のない物理ポートに接続された静的IP WAN)。
- コネクタの電源を入れ直します。
高可用性でサイトを設定すると、コネクタのWANとLANは同じ構成を持ち、2つのノードに複製されます。コネクタが故障した場合、他のコネクタがアクティブノードとなり、LANゲートウェイIPの構成を引き継ぎ、トラフィックが中断することなく継続されます。
高可用性構成のコネクタは単一のサイトを共有するため、次の設定が必要です:
- 静的アドレス:サイトのプライマリノードのIP。
- セカンダリ静的アドレス:サイトのセカンダリノードのIP。
- 仮想静的アドレス:コネクタの南側にあるLANがトラフィックを転送するIP、つまりLANのゲートウェイIPです。
すべてのIPが同じサブネットに属していることを確認してください。
既存のサイトに対して高可用性を有効にすることはできません。Cloudflareダッシュボードで既存のサイトに高可用性を追加するには、サイトを削除して再度作成する必要があります。
高可用性構成を設定するには:
- サイトの作成の手順に従い、ステップ4まで進みます。
- サイトに名前を付けた後、高可用性を有効にするを選択します。
- コネクタの下で、コネクタを追加を選択します。
- リストから最初のコネクタを選択し、> コネクタを追加を選択します。
- 前の画面に戻り、セカンダリコネクタを追加を選択します。
- リストから2つ目のコネクタを選択し、> コネクタを追加を選択します。
- 次へを選択して、WANを作成します。静的IPを構成している場合は、プライマリノードのIPを静的アドレスとして、セカンダリノードのIPをセカンダリ静的アドレスとして構成します。
- LANを作成するには、上記のLANを作成の手順に従い、ステップ4まで進みます。
- 静的アドレスに、サイトのプライマリノードのIPを入力します。例えば、
192.168.10.1/24。 - セカンダリ静的アドレスに、サイトのセカンダリノードのIPを入力します。例えば、
192.168.10.2/24。 - 仮想静的アドレスに、コネクタの南側にあるLANがトラフィックを転送するIPを入力します。例えば、
192.168.10.3/24。 - 保存を選択します。
- 高可用性プロービングリンクのドロップダウンメニューから、ノードの健康を監視するために使用するポートを選択します。Cloudflareは、HAプロービングリンクとして信頼性の高いインターフェースを選択することを推奨します。プライマリノードとセカンダリノードのプロービングリンクはスイッチを介して接続される必要があり、直接接続ではいけません。
- Magic WANコネクタのセットアップおよびコネクタの有効化の手順に従って、コネクタの設定を完了します。
Magic WAN Connector automatically creates IPsec tunnels and static routes for you. You cannot configure these manually.
To check the IPsec tunnels and static routes created by your Magic WAN Connector:
- Log in to the Cloudflare dashboard ↗ and select your account.
- Go to Magic WAN > Sites.
- Select the name of the site for which you want to check the Connector’s IPsec tunnels and static routes, and select Edit.
- Select Tunnels to check IPsec tunnels, and Routes for the static routes.