仮想コネクタの設定
Virtual Magic WAN Connector(仮想コネクタ)は、ハードウェアベースのMagic WAN Connectorアプライアンスの代替となる仮想アプライアンスです。これらの2つのコネクタのバージョンは、それ以外は同一です。
仮想コネクタをインストールする前に、Magic WANが有効なエンタープライズアカウントが必要です。さらに、仮想コネクタを実行するために十分なコンピュート、メモリ、およびストレージを持つVMwareホストが必要です。これには以下が含まれます:
- Intel x86 CPUアーキテクチャ
- ESXiハイパーバイザー7.0U1以上
- 仮想コネクタごとに4つの仮想CPU(CPUの過剰競合を避けるために、1:1の仮想CPU対物理コアの割り当てでの展開を推奨します。これによりパケットロスが発生します。)
- 仮想コネクタごとに8GBのRAM
- 仮想コネクタごとに8GBのディスク
- インターネットにアクセスできる1つのvSwitchポートグループまたはVLAN(例:WANを通じて)
- 内部LANとなる1つ以上のvSwitchポートグループまたはVLAN
ESXiのインストール方法や仮想マシンの設定についての詳細は、VMwareのドキュメント ↗を参照してください。
Cloudflareのアカウントチームに連絡して、仮想コネクタのOVAパッケージ ↗とライセンスキーを取得してください。OVAイメージには、適切な設定で仮想コネクタ用の仮想マシン(VM)をインストールおよび構成するために必要なファイルが含まれています。
このイメージは、異なる場所または同じESXiホスト上で複数の仮想コネクタのインスタンスを作成するために複数回展開できます。
作成された各インスタンスに対して1つのライセンスキーを消費します。たとえば、10個の仮想コネクタを展開したい場合は、10個のライセンスキーをリクエストする必要があり、アカウントチームはCloudflareダッシュボードに10個のコネクタインスタンスを作成します。
以下の手順は、すでに十分なリソースを持つVMware ESXiハイパーバイザーがインストールされていることを前提としています。詳細については、前提条件を参照してください。
- VMware ESXiを設定する際に、仮想コネクタ用のポートグループを作成する必要があります。Networking > Port groupsに移動し、希望するネットワークトポロジーのためにvSwitchポートグループおよび/またはVLANを準備します。たとえば、シンプルな展開では通常次のようになります:
- 仮想コネクタがIPアドレス(静的またはDHCP)を取得し、インターネットにアクセスできるWANポートグループ。
- 仮想コネクタがデフォルトルーターとして機能し、場合によってはDHCPサーバーとして機能するLANポートグループ。
- 仮想コネクタ内で未使用の仮想インターフェースを割り当てるためのnullまたは未使用のポートグループ。たとえば、
Null port groupという名前のnullポートグループを作成し、VLAN IDを999に設定できます。
-
Cloudflareアカウントチームから提供されたOVAイメージ内のファイルを抽出します。たとえば:
tar -xvf mconn-2024-1-3.ovaファイルを抽出するフォルダーに注意してください。VMを作成する際にそのフォルダーを参照する必要があります。
-
Virtual Machines > Create/Register VMウィザードに移動して、仮想コネクタの展開を開始します。
-
OVFまたはOVAファイルから仮想マシンを展開を選択し、次へをクリックします。
-
仮想マシンの説明的な名前を選択します。
-
OVAイメージから抽出したファイルをアップロードします。これには
mconn.ovf、mconn.nvram、およびmconn.vmdkが含まれます。 -
OVAイメージから抽出したファイルを保存する場所を選択し、次へをクリックします。
-
Networking mappingsで、以前に設定したポートグループに従って希望するトポロジーの割り当てを選択します:
- たとえば、
eno1ポートをVM NetworkにマッピングしてWANを作成し、eno2をLAN0にマッピングしてLANポートとして機能させます。 - 未使用のポートを
nullポートグループに割り当てます。 - 設定内容をメモしてください。この情報はCloudflareダッシュボードでネットワークを構成する際に必要です。
- たとえば、
-
Disk provisioningで、Thinを選択します。
-
展開ウィザードを完了する前に、自動的に電源を入れるを無効にします。これは、起動前にライセンスキーを構成できるようにするために重要です。
-
アカウントチームから提供されたライセンスキーで仮想マシンを構成します:
- 仮想コネクタのVMを選択し、設定をクリックします。
- VMオプション > 詳細 > 設定の編集に移動します。
- パラメータを追加を選択してライセンスキーを追加します。最後のエントリまでスクロールダウンし(ここにVMwareが新しいパラメータを追加します)、次の2つの新しいエントリを追加します:
- Key:
guestinfo.cloudflare.identity - Value:
<YOUR_LICENCE_KEY>
- Key:
- 保存を選択して仮想コネクタの構成を完了します。
- Cloudflareダッシュボードでの設定を続けます。
Sites represent the local network where you have installed your Magic WAN Connector — for example, a branch office location.
You need to create a site and set up all the settings associated with it before you can connect your Magic WAN Connector to the Internet.
To add a site:
- Log in to the Cloudflare dashboard ↗ and select your account.
- Go to Magic WAN > Sites.
- Select Create to create a new site and start the configuration wizard.
- Add a name and description for your new site.
- (Optional) In Site location, you can add the geographical coordinates for your site. If you add geographical coordinates, your site will show up in the Site Analytics overview map.
- Under Connector, select Add Connector. This will show you a list of Magic WAN Connector devices associated with your account. 仮想コネクタを表示するには、すでにOVAパッケージとライセンスキーを取得している必要があります。
- If you have more than one Connector, choose the one that corresponds to the site you are creating. Connectors are identified by a serial number, also known as a service tag. Use this information to choose the right Connector. Select Add Connector when you are ready to proceed.
- The Connector will be added to your site with an Interrupt window defined. The interrupt window is the time period when the Magic WAN Connector software can update, which may result in interruption to existing connections. You can change this later. Refer to Interrupt window for more details on how to define when the Connector can update its systems.
- Select Next to proceed to creating your WAN and LAN networks.
Create a POST request using the API to create a site.
Example:
curl https://api.cloudflare.com/client/v4/accounts/{account_id}/magic/sites \--header "X-Auth-Email: <EMAIL>" \--header "X-Auth-Key: <API_KEY>" \--header "Content-Type: application/json" \--data '{ "site": { "description": "<SITE_DESCRIPTION>", "name": "<SITE_NAME>" }}'If you created your site successfully, you should receive a message similar to the following:
{ "result": { "site": { "id": "<SITE_ID>", "name": "<SITE_NAME>", "description": "<SITE_DESCRIPTION>", "connector_id": null, "secondary_connector_id": null, "ha_mode": false } }, "success": true, "errors": [], "messages": []}Take note of the site id parameter, as you will need it to create WANs and LANs.
- In WAN configuration, select Create. You can create one or more wide area networks (WANs) ↗. Configuring multiple WANs will create multiple IPsec tunnels. This allows the Connector to failover between circuits according to their health.
- In Interface name, enter a descriptive name for your WAN.
- Interface number VMwareで設定した仮想コネクタインスタンスの仮想ネットワークインターフェースに対応する必要があります。前の手順の例に従って、ポート
1を選択する必要があります。これは、VMwareで設定したeno1ポートに対応します。 - In VLAN ID, enter a number between
0and4094to specify a VLAN ID. - In Priority, choose the priority for your WAN. Lower numbers have higher priority. Refer to Traffic steering to learn more about how Cloudflare calculates priorities.
- Addressing: Specify whether the WAN IP is fetched from a DHCP server or if it is a static IP. If you choose a static IP, you also need to specify the static IP and gateway addresses.
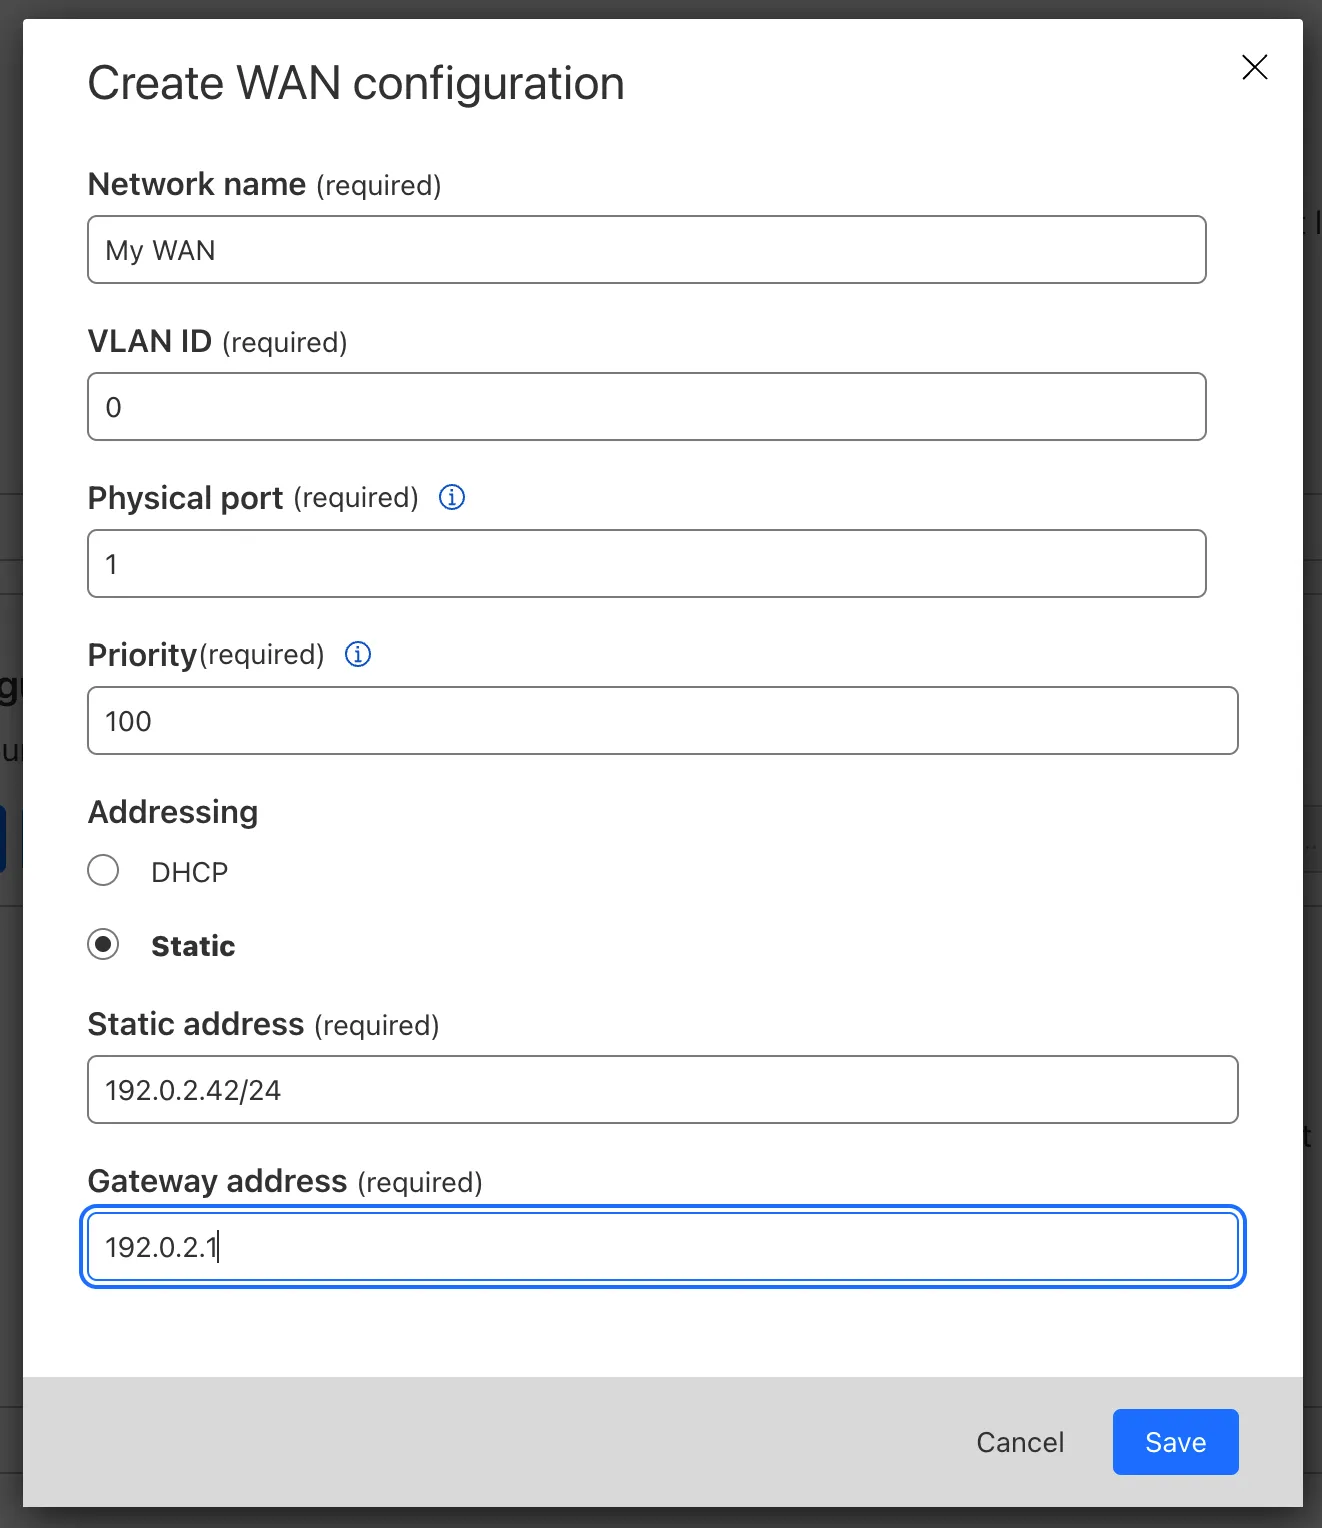
- Select Save when you are finished.
Create a POST request using the API to create a WAN.
The static_addressing object is optional. Omit it if you are using DHCP. If you are using static addressing, add the secondary_address parameter when your site is in high availability (HA) mode.
Example:
curl https://api.cloudflare.com/client/v4/accounts/{account_id}/magic/sites/{site_id}/wans \--header "X-Auth-Email: <EMAIL>" \--header "X-Auth-Key: <API_KEY>" \--header "Content-Type: application/json" \--data '{ "wan": { "description": "<YOUR_WAN_NAME>", "physport": 1, "priority": 0, "vlan_tag": 0 }}'-
In LAN configuration, select Create.
-
Enter a descriptive name for your LAN in Interface name.
-
Interface number VMwareで設定した仮想コネクタインスタンスの仮想LANインターフェースに対応する必要があります。前の手順の例に従って、ポート
2を選択する必要があります。これは、VMwareで設定したeno2ポートに対応します。 -
In VLAN ID, specify a VLAN ID to create virtual LANs.
-
In Static addressing > Static address give your Connector’s LAN interface its IP address. You can also enable the following options if they suit your use case:
- This is a DHCP server: If your Connector is a DHCP server.
- This is a DHCP relay: If your Connector is a DHCP relay.
-
(Optional) In Directly attached subnet > Static NAT prefix, enter a CIDR prefix to enable NAT (network address translation). The prefix you enter here should be the same size as the prefix entered in Static addressing. For example, both networks have a subnet mask of
/24:192.168.100.0/24and10.10.100.0/24. -
(Optional) If your LAN contains additional subnets behind a layer 3 router, select Add routed subnet under Routed subnets to add them:
-
Prefix: The CIDR prefix for the subnet behind the L3 router.
-
Next hop: The address of the L3 router to which the Connector should forward packets for this subnet.
-
Static NAT prefix: Optional setting. If you want to enable NAT for a routed subnet, supply an “external” prefix for the overlay-facing side of the NAT to use. It must be the same size as Prefix.
Refer to Routed subnets for more information.
-
-
Select Save.
-
Select Save and exit to finish your configuration. Tunnels and static routes will be automatically created and associated with your site once the Magic WAN Connector boots up (refer to the next step).
Create a POST request using the API to create a LAN.
Example:
curl https://api.cloudflare.com/client/v4/accounts/{account_id}/magic/sites/{site_id}/lans \--header "X-Auth-Email: <EMAIL>" \--header "X-Auth-Key: <API_KEY>" \--header "Content-Type: application/json" \--data '{ "lan": { "description": "<YOUR_LAN_NAME>", "physport": 2, "static_addressing": { "address": "172.16.14.0/24" }, "vlan_tag": 0 }}'After setting up your LANs, you can configure your Connector to enable communication between them without traffic leaving your premises. Refer to Network segmentation for more information.
Magic WAN Connector supports different types of DHCP configurations. Connector can:
- Connect to a DHCP server or use a static IP address instead of connecting to a DHCP server.
- Act as a DHCP server.
- Use DHCP relay to connect to a DHCP server outside the location your Magic WAN Connector is in.
- Reserve IP addresses for specific devices on your network.
Refer to DHCP options to learn more.
仮想Magic WANコネクタは、インストール後に非アクティブになります。, and will only establish a connection to the Cloudflare network when it is activated. Cloudflare recommends leaving it deactivated until you finish setting it up in the dashboard.
When the Connector is first activated, one of the ports must be connected to the Internet through a device that supports DHCP. This is required so that the Connector can reach the Cloudflare global network and download the required configurations that you set up in the site configuration step.
When you are ready to connect your Magic WAN Connector to the Cloudflare network:
- Log in to the Cloudflare dashboard ↗ and select your account.
- Go to Magic WAN > Configuration > Connectors.
- Find the Connector you want to activate, select the three dots next to it > Edit. Make sure you verify the serial number to choose the right connector you want to activate.
- In the new window, the Status dropdown will show as Deactivated. Select it to change the status to Activated.
- The Interrupt window is the time period when the Magic WAN Connector software can update, which may result in interruption to existing connections. Choose a time period to minimize disruption to your sites. Refer to Interrupt window for more details on how to define when the Connector can update its systems.
- Select Update.
- VMwareのVirtual Machinesに移動し、仮想コネクタのVMを起動します。
- 仮想コネクタはCloudflareにリクエストを送信します。このステップでは、仮想コネクタが提供されたライセンスキーを登録し、サイト構成をダウンロードします。
- 仮想コネクタは、Cloudflareダッシュボードで作成したサイトからダウンロードした構成に従ってLANおよびWAN接続を設定します。仮想コネクタはIPsecトンネルも確立します。
- 成功した場合、トンネルヘルスチェックは正常として表示されます。
- 正常なハートビートがCloudflareダッシュボードに表示されない場合は、VMwareで仮想コネクタのVMを再起動してください。
Magic WAN Connector automatically creates IPsec tunnels and static routes for you. You cannot configure these manually.
To check the IPsec tunnels and static routes created by your Magic WAN Connector:
- Log in to the Cloudflare dashboard ↗ and select your account.
- Go to Magic WAN > Sites.
- Select the name of the site for which you want to check the Connector’s IPsec tunnels and static routes, and select Edit.
- Select Tunnels to check IPsec tunnels, and Routes for the static routes.